

What happens when you export a timeline
- You get a folder with a copy of your media files.
- Your original files are preserved.
- Your edits from Descript are included, so you can continue trimming and adjusting in your editor.
- Timecode from your original files is preserved for syncing (Sony XAVC timecode is ignored in Final Cut Pro exports).
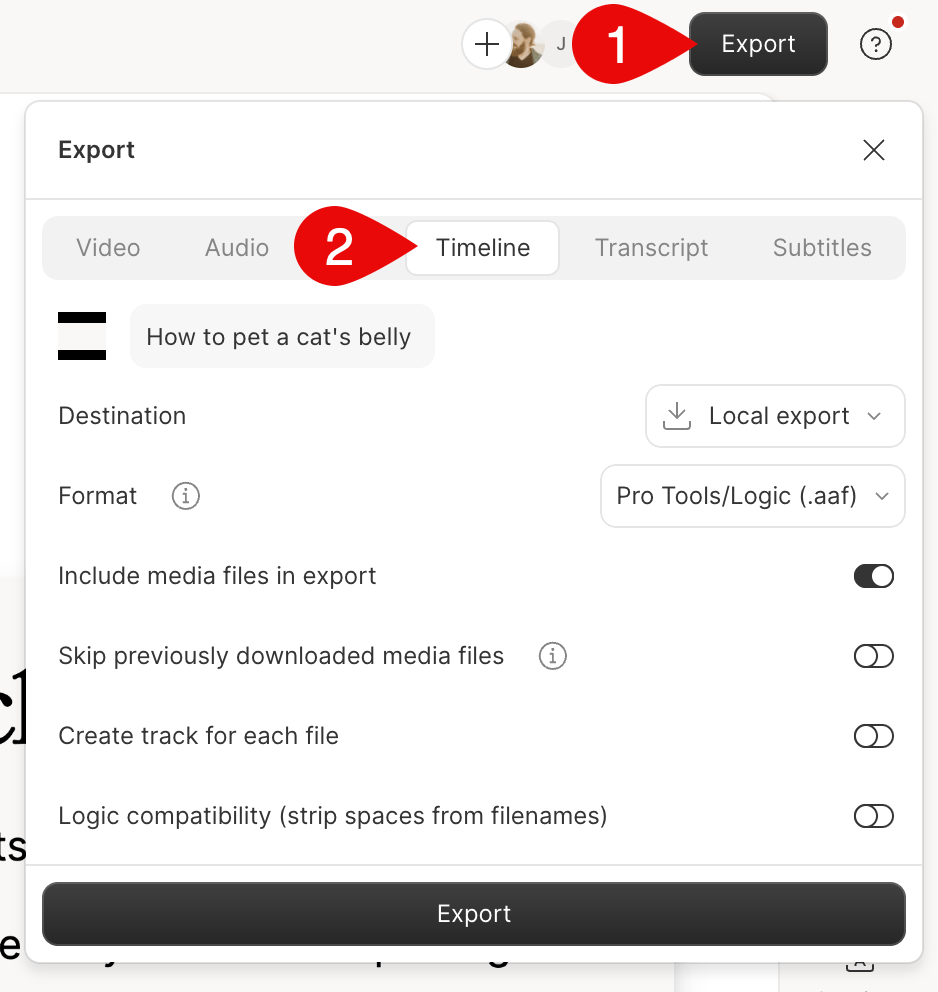
Descript export panel showing how to export to Timeline format.
Export settings
Export comments as markers
- Click Export and select Timeline.
- Choose a Format and turn on Include comments as markers when the option is available.
- Click Export and choose where to save your timeline.
Limitations
Exporting AAF files or room tone:- Some Pro Tools editions don’t support AAF imports — check the Pro Tools plan comparison for compatibility.
- AAF exports also split stereo files into two mono tracks.
- If you’re exporting room tone, note that it’s only included if your project is audio-only and Studio Sound is turned off.
- Timeline export will default to the highest sample rate found in the project. For example, if most of your files are 44.1 kHz but one is 48 kHz, all files will be upsampled to 48 kHz on export.
Export a native Premiere project (.prproj)
The Premiere (.prproj) format creates a Premiere Pro project file instead of an XML file. Use it when your composition uses a multicam sequence and you want to keep switching camera angles in Premiere.Beta formatPremiere (.prproj) is in Beta and isn’t on every account yet. If it’s missing from the Format menu, use Premiere (XML).
- Click Export and select Timeline.
- Open the Format menu and choose Premiere (.prproj).
- Adjust any other settings, then click Export.
- Open the exported project in Premiere Pro.
- Each camera layer in a supported sequence becomes a multi-camera clip with Multi-Camera already turned on. To switch angles, right-click the clip and choose Multi-Camera.
- Your cuts, gaps, and selected camera angles.
- Linked video and audio edits, plus audio trims, gain, and fades.
- Independent layers stay on their own tracks.
- Layer position, scale, crop, and other visual transforms don’t export.
- Switching angles in Premiere changes the video only. The audio stays the same.
- Clips with speed changes, layers that aren’t camera angles, and unsupported sources export as regular clips, not multicam clips.
XML Interchange Feature Chart
Studio Sound and timeline exportsWhenever Studio Sound is applied to a file, a new source file is created with the Studio Sound effect. For files with an intensity setting of less than 100%, Descript automatically blends the source and studio sound file together.Timeline exports of Studio Sound files will include both the source audio and Studio Sound files separately, with volume adjusted to match the configured intensity value in your source composition.
Troubleshooting common timeline export issues
If you’re running into problems with your exported timeline in another app, check the sections below for fixes and workarounds based on the app you’re using.Missing elements after export
Missing elements after export
Some Descript features aren’t supported in timeline exports. Refer to the XML feature chart for compatibility details.
In Reaper, Studio Sound intensity is set to 100% despite Descript settings being different
In Reaper, Studio Sound intensity is set to 100% despite Descript settings being different
When you adjust the Studio Sound intensity in Descript, it creates a live mix between the original and enhanced audio. However, timeline exports don’t preserve this blend — only the original (0%) or fully enhanced (100%) version is exported by default.To work around this, you have three options:
- Set Studio Sound to 0%: Export only the original, unenhanced audio.
- Set Studio Sound to 100%: Export only the fully enhanced audio.
- Replace the track with a custom mix:
- Create a new composition with Studio Sound set to your preferred intensity.
- Export the mixed audio from the new composition.
- Use the Replace file feature to swap the mixed version into your project.
- Export your timeline as normal.
“Invalid edit with no respective media” error
“Invalid edit with no respective media” error
This usually means your project contains clips with different frame rates. Re-export your files with matching frame rates, then use the Replace file feature before exporting the timeline.
Subtitles missing in Premiere
Subtitles missing in Premiere
If subtitles disappear after a certain point in your timeline in Premiere, it’s often caused by a subtitle card that contains only periods (”.”).To fix this: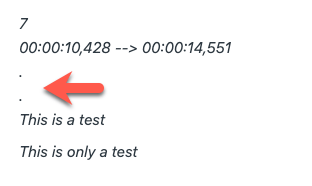
- Export your subtitles as an SRT file from Descript.
- Open the SRT file in a text editor (like Notepad or TextEdit).
- Look for any subtitle cards that only contain periods on a new line.
- Delete those lines completely.
- Save the cleaned SRT file.
- Re-import the corrected SRT file into your Premiere project.
Layers import in reverse order (Final Cut Pro)
Layers import in reverse order (Final Cut Pro)
Move the layers above the main storyline in Final Cut Pro to restore correct stacking order after import.
Missing files in Pro Tools
Missing files in Pro Tools
Use Manually Find & Relink in Pro Tools to manually reconnect missing files. Make sure you:
- Expand folders in the Relink window and check the box for your source file folder.
- Select individual missing files before clicking Find all Candidates.
- Commit the links after matching candidates are found.
Red hue or bright video in Premiere
Red hue or bright video in Premiere
If HDR content appears overly red or bright when imported into Premiere, open Sequence Settings and change the color space to Rec. 2100 HLG to correct the display.
Pro Tools renames files with “.A1”
Pro Tools renames files with “.A1”
This is expected behavior when importing multichannel audio in Pro Tools. It automatically adds ”.A1”, ”.A2”, etc. to track names. This does not affect audio quality.