> ## Documentation Index
> Fetch the complete documentation index at: https://help.descript.com/llms.txt
> Use this file to discover all available pages before exploring further.
# Placeholder Layers
> Add placeholder layers to mark where media should go in your project.
Block out your project before the real footage exists. Drop a placeholder where B-roll, a screen recording, or a stock shot will eventually go, then swap in the finished asset when it's ready.
 ## Add a placeholder layer
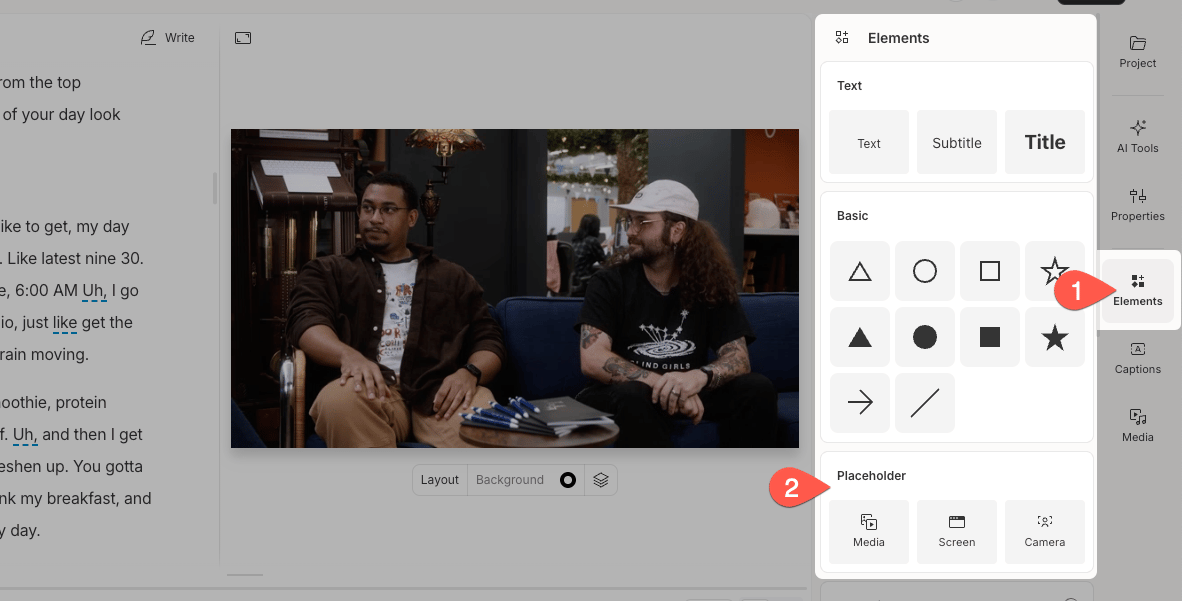
1. Open the **Elements Panel** in the sidebar.
2. Locate the **Placeholder** section, then choose a placeholder icon that best matches the media you'll add later.
* Media – For B-roll, supporting visuals, or images
* Camera – For webcam-style clips
* Screen – For screen recordings or app walkthroughs
## Customize a placeholder layer
## Add a placeholder layer
1. Open the **Elements Panel** in the sidebar.
2. Locate the **Placeholder** section, then choose a placeholder icon that best matches the media you'll add later.
* Media – For B-roll, supporting visuals, or images
* Camera – For webcam-style clips
* Screen – For screen recordings or app walkthroughs
## Customize a placeholder layer
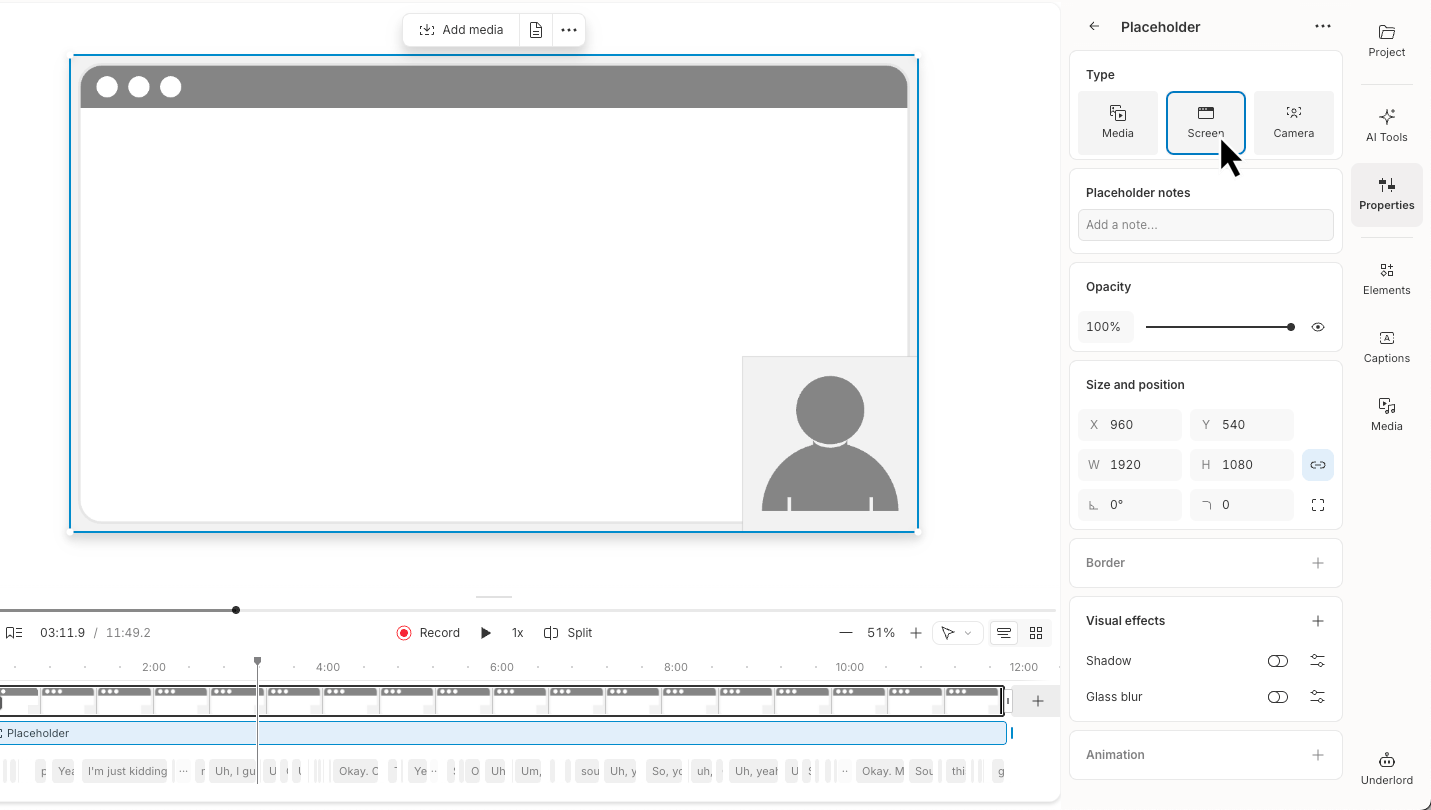 Select a placeholder layer to customize its properties:
| | |
| ---------------------------------------------------------------------------- | ------------------------------------------------------------------------------------------------------ |
| **Placeholder Notes** | Add a note to describe what type of media should go in the placeholder. |
| **Opacity** | Adjust the placeholder layer opacity. |
| **Size and Position** | Adjust the placeholder’s dimensions, rotation, and corner rounding using the size and position fields. |
| **Border** | Add a border for better visibility or styling. |
| [**Effects**](/effects-animations-transitions/overview) | Add effects like shadows to make the placeholder more prominent. |
| [**Animation**](/effects-animations-transitions/apply-and-adjust-animations) | Add custom animations to your placeholder layer. |
## Replace placeholder layers with media
When you’re ready to replace a placeholder with actual media, follow these steps:
1. Click on the placeholder to activate it.
2. Use the **Add Media** button from the hover menu above the placeholder.
3. Select one of the following options:
* **Add File**: Upload media from your computer.
* **Record**: Capture video or audio directly.
* **Add Stock Media**: Choose from Descript’s stock media library.
* **Generate Media**: Use Descript’s AI tools to create a visual asset.
* Or, **drag and drop** media directly onto the placeholder.
You'll see a pulsing blue border as the placeholder is swapped for your media.
Select a placeholder layer to customize its properties:
| | |
| ---------------------------------------------------------------------------- | ------------------------------------------------------------------------------------------------------ |
| **Placeholder Notes** | Add a note to describe what type of media should go in the placeholder. |
| **Opacity** | Adjust the placeholder layer opacity. |
| **Size and Position** | Adjust the placeholder’s dimensions, rotation, and corner rounding using the size and position fields. |
| **Border** | Add a border for better visibility or styling. |
| [**Effects**](/effects-animations-transitions/overview) | Add effects like shadows to make the placeholder more prominent. |
| [**Animation**](/effects-animations-transitions/apply-and-adjust-animations) | Add custom animations to your placeholder layer. |
## Replace placeholder layers with media
When you’re ready to replace a placeholder with actual media, follow these steps:
1. Click on the placeholder to activate it.
2. Use the **Add Media** button from the hover menu above the placeholder.
3. Select one of the following options:
* **Add File**: Upload media from your computer.
* **Record**: Capture video or audio directly.
* **Add Stock Media**: Choose from Descript’s stock media library.
* **Generate Media**: Use Descript’s AI tools to create a visual asset.
* Or, **drag and drop** media directly onto the placeholder.
You'll see a pulsing blue border as the placeholder is swapped for your media.