> ## Documentation Index
> Fetch the complete documentation index at: https://help.descript.com/llms.txt
> Use this file to discover all available pages before exploring further.
# Create a Custom Avatar
> Create a custom Descript avatar with a photo or text prompt.
Descript's avatars are AI presenters that lip-sync to your speaker's voice. Create one in your own likeness or invent a brand-new face to front your videos.
**Usage note**
On current plans, this feature uses **AI Credits**. Learn more about [tracking your Media Minutes and AI Credits](/billing-payments-plans/track-and-understand-your-media-minutes-and-ai-credits).
Legacy and Sunset plans track usage differently. See our [Understanding your Legacy and Sunset plan](/billing-payments-plans/legacy-sunset) guide for details.
## Create a custom avatar with a text prompt
Create a new avatar by entering a description and Descript will generate a unique image based entirely on your prompt.
1. Assign a speaker to your script.
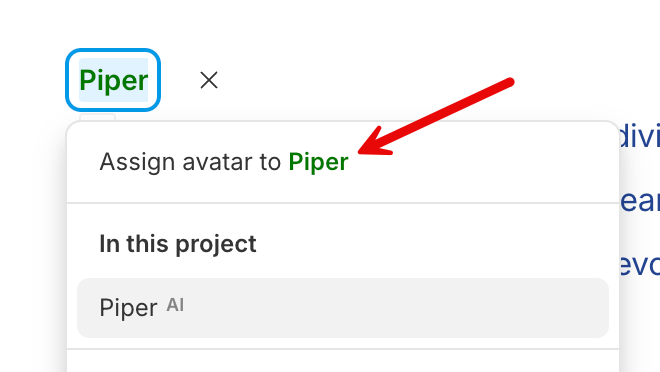
2. Click the speaker label and choose **Assign avatar to \[speaker name]**.\\
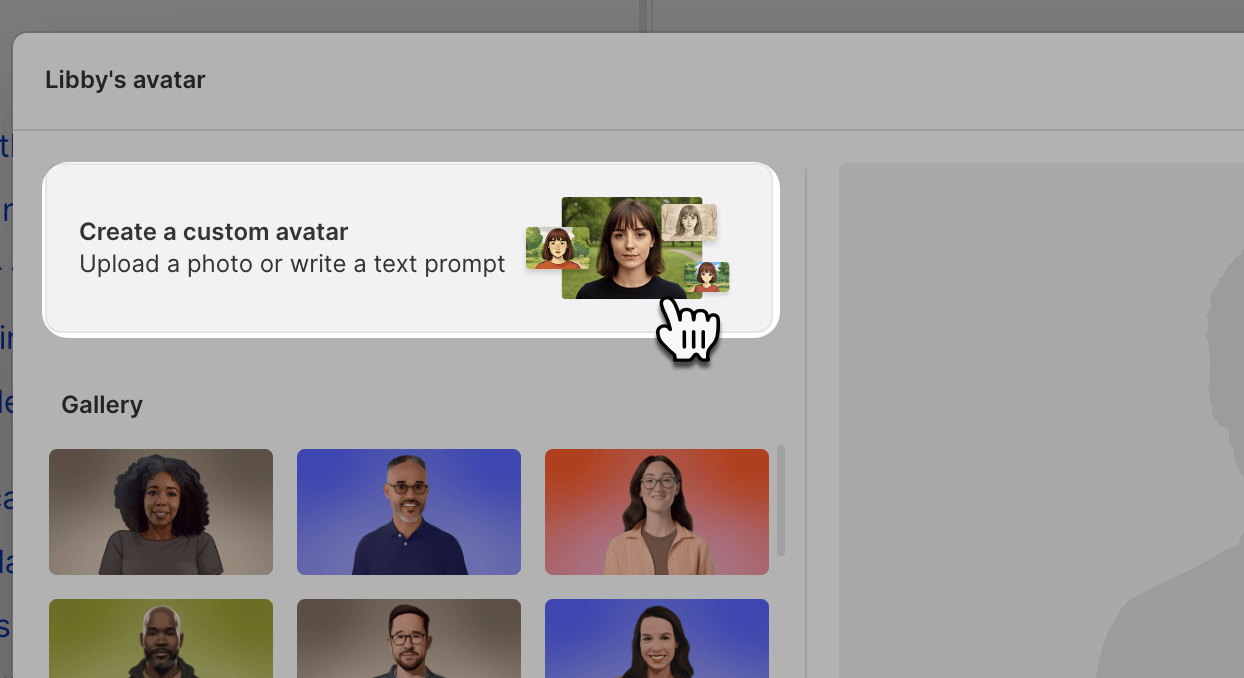
 3. Click the **Create a custom avatar button**.\\
 4. In the **Text prompt** tab, enter a description or click **Inspire** for a suggested prompt. Describe a realistic, adult, non-celebrity, human-like figure. [See avatar best practices.](/generative-media/custom-avatars)
5. (Optional) Choose a style for your avatar from the available options in our [style library.](/generative-media/style-library)
6. Descript will generate three avatar options. You can:
* Select one of the images to apply, or
* Continue iterating on your prompt. Previous generations remain visible as long as the avatar modal stays open.
7. Click **Assign avatar** to create the avatar and assign it to your speaker.
8. Once your script is finalized, click **Generate avatar** to animate the image and sync it with the speech audio.
## Upload a photo to create your custom avatar
Upload a photo to use as your avatar. Be sure to reference [the best practices](/generative-media/custom-avatars) for image guidelines that will yield the best results.
1. Assign a speaker to your script.
2. Click the speaker label and choose **Assign avatar to \[speaker name]**.
3. Click the **Create a custom avatar button**.
4. Click the **Upload an image** button and select a supported image file (`.jpeg`, `.png`, or `.webp`).\\
4. In the **Text prompt** tab, enter a description or click **Inspire** for a suggested prompt. Describe a realistic, adult, non-celebrity, human-like figure. [See avatar best practices.](/generative-media/custom-avatars)
5. (Optional) Choose a style for your avatar from the available options in our [style library.](/generative-media/style-library)
6. Descript will generate three avatar options. You can:
* Select one of the images to apply, or
* Continue iterating on your prompt. Previous generations remain visible as long as the avatar modal stays open.
7. Click **Assign avatar** to create the avatar and assign it to your speaker.
8. Once your script is finalized, click **Generate avatar** to animate the image and sync it with the speech audio.
## Upload a photo to create your custom avatar
Upload a photo to use as your avatar. Be sure to reference [the best practices](/generative-media/custom-avatars) for image guidelines that will yield the best results.
1. Assign a speaker to your script.
2. Click the speaker label and choose **Assign avatar to \[speaker name]**.
3. Click the **Create a custom avatar button**.
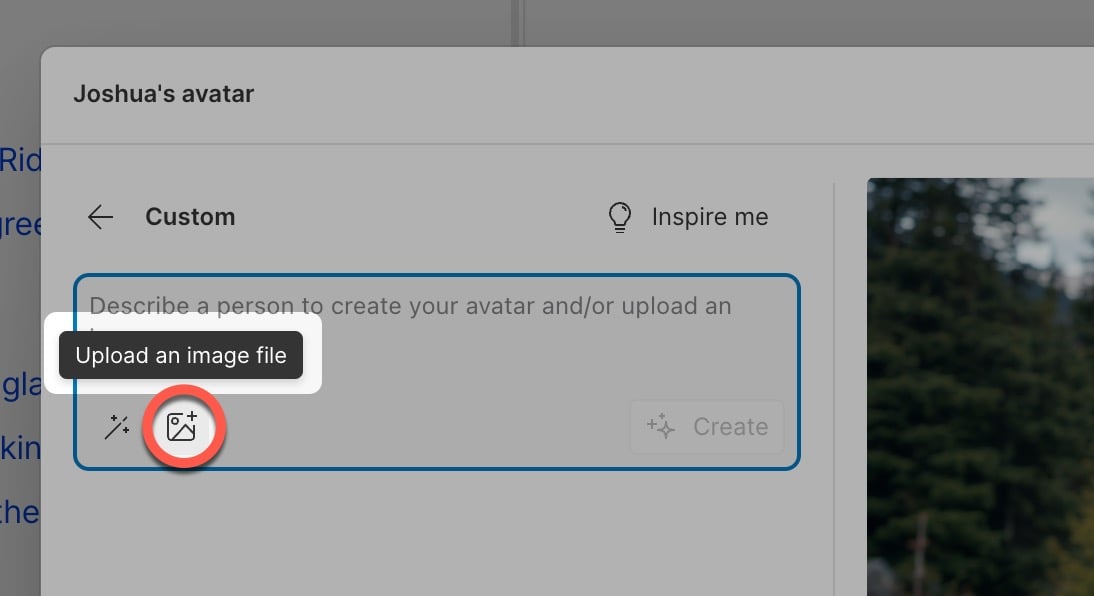
4. Click the **Upload an image** button and select a supported image file (`.jpeg`, `.png`, or `.webp`).\\
 5. Click the **Create** button to complete the upload.\\
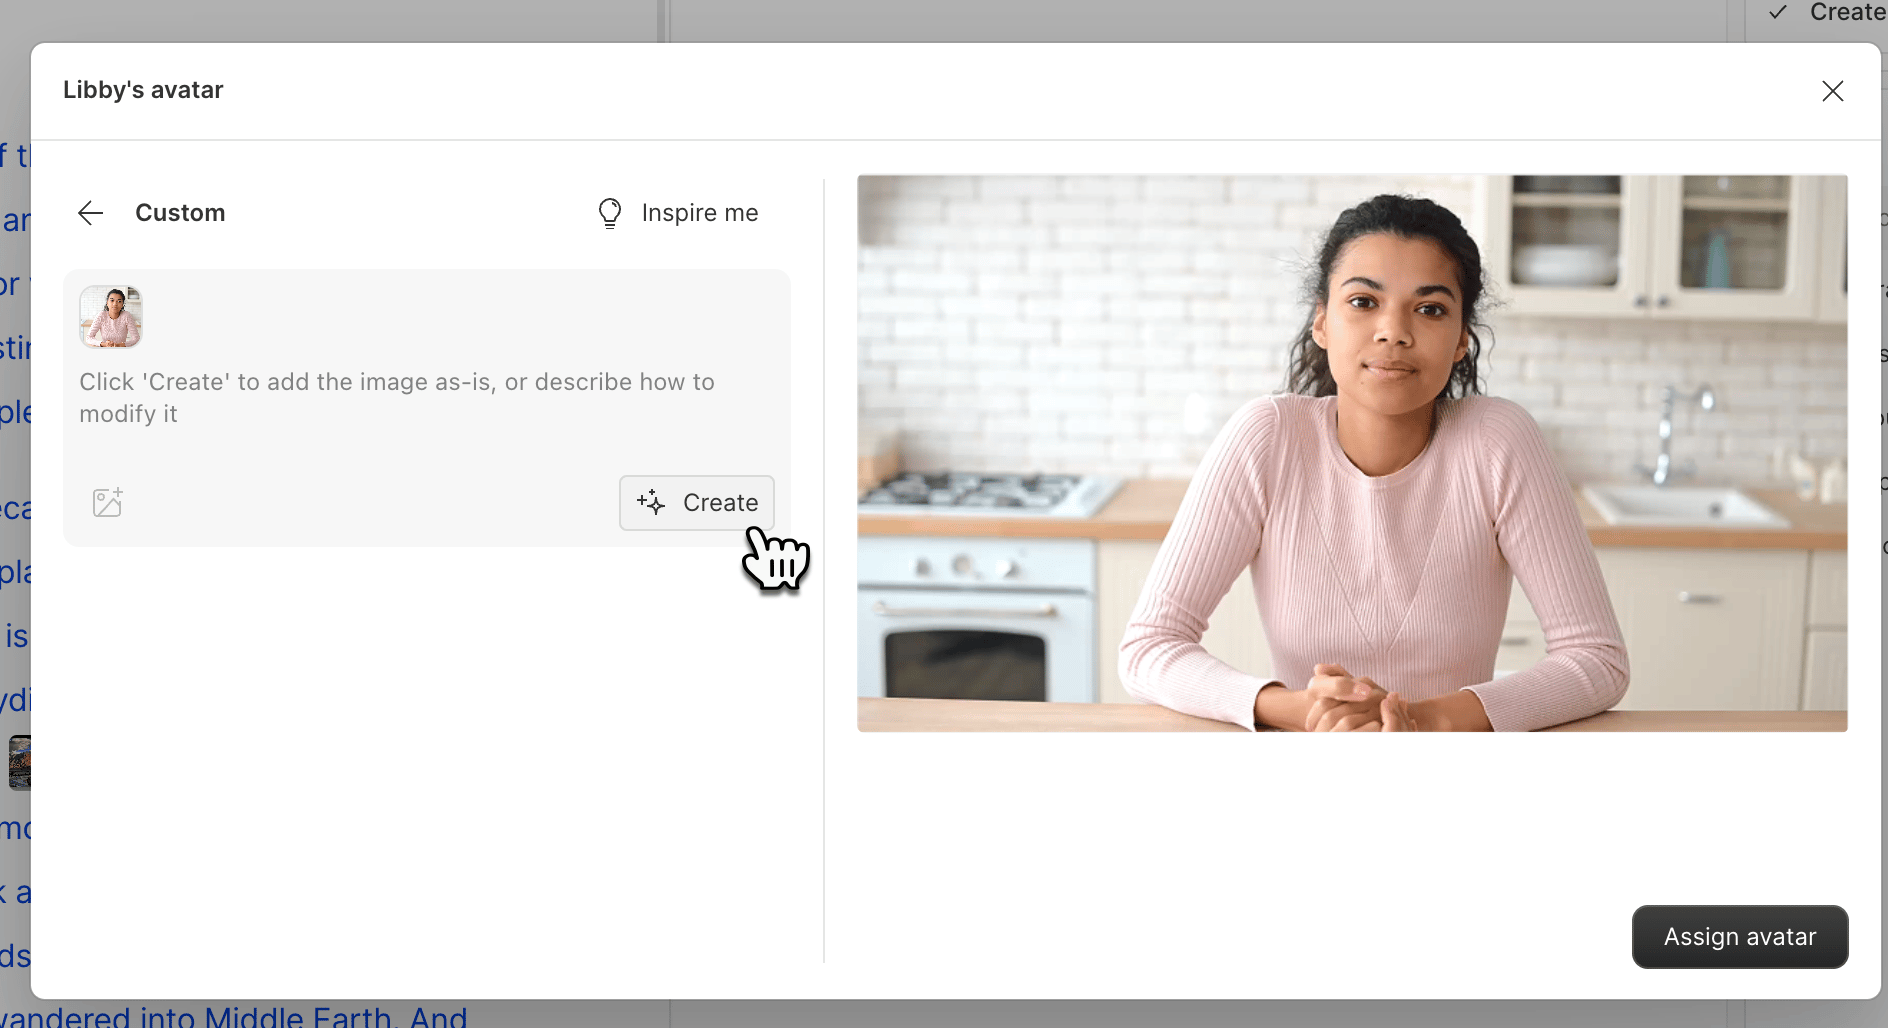 6. If you just want to use the photo with no additional changes, click the **Assign avatar** button in the bottom right-hand corner.
Like AI-generated images, uploaded photos are subject to safety checks. Images may be rejected if they contain celebrities, minors, or explicit content. See [best practices](/generative-media/custom-avatars) for full image requirements.
## Add an image to your prompt
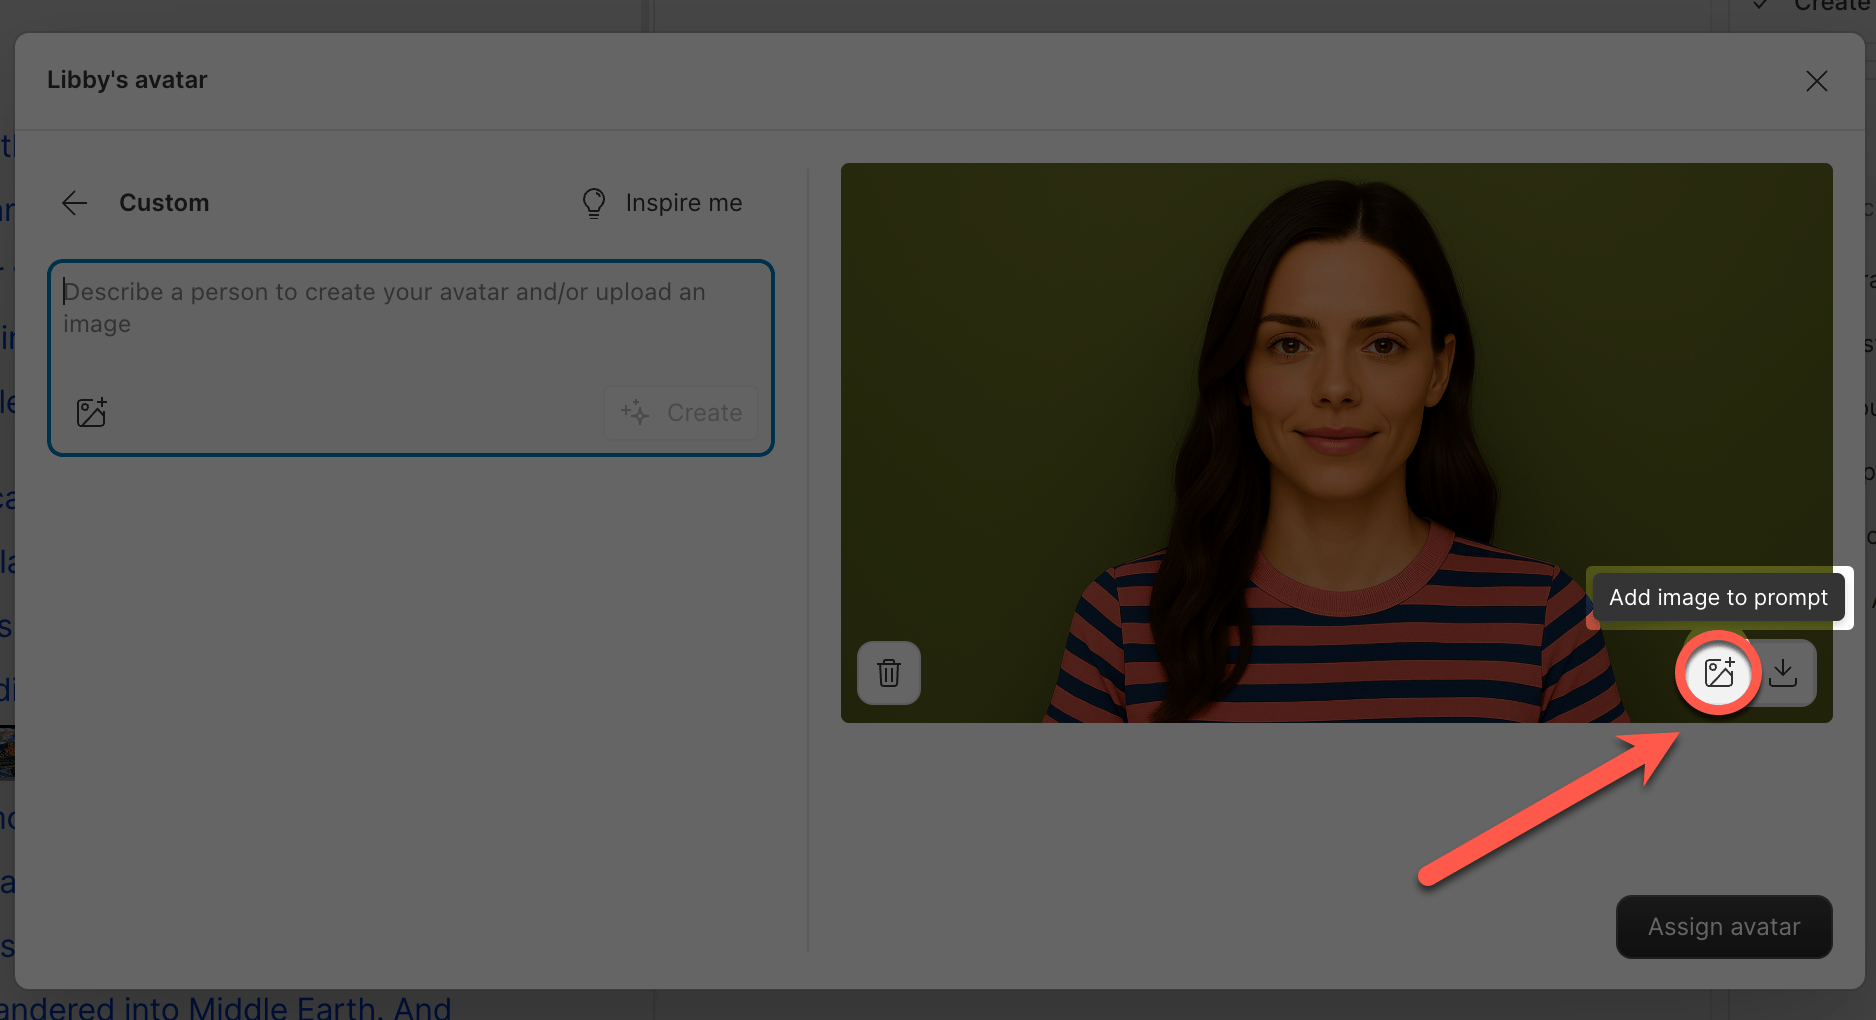
Want to give your avatar a new look while keeping the same base image? In the preview pane on the right side of the avatar window, hover over the image and click **Add image to prompt**. This adds the image to your text prompt, and Descript will generate your next avatar using both the prompt and the attached image.
6. If you just want to use the photo with no additional changes, click the **Assign avatar** button in the bottom right-hand corner.
Like AI-generated images, uploaded photos are subject to safety checks. Images may be rejected if they contain celebrities, minors, or explicit content. See [best practices](/generative-media/custom-avatars) for full image requirements.
## Add an image to your prompt
Want to give your avatar a new look while keeping the same base image? In the preview pane on the right side of the avatar window, hover over the image and click **Add image to prompt**. This adds the image to your text prompt, and Descript will generate your next avatar using both the prompt and the attached image.
 To see the entire workflow from start to finish, check out the tutorial video below:
## Save your avatar images
Any avatar image you generate is automatically saved to your **Project files** under **AI Assets > Generated Avatar Images**. You can access them there to reuse or restyle later.
You can also download the image to your device by clicking the **Download** icon.
## Manage or update custom avatars
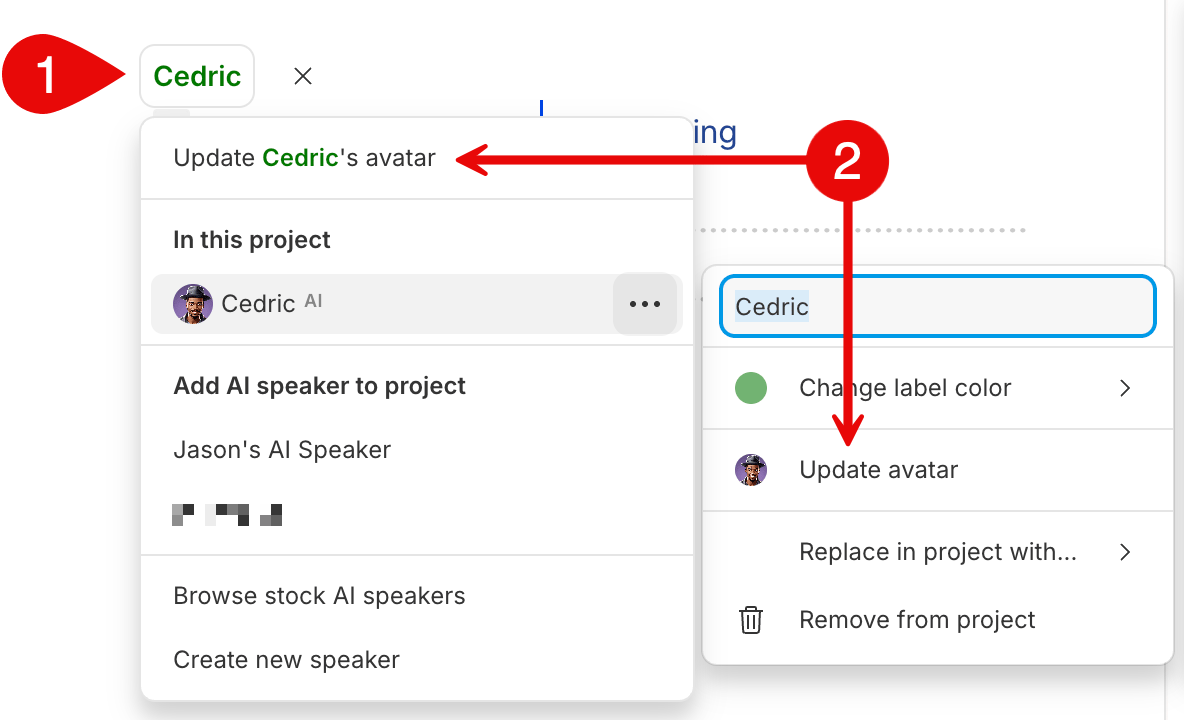
To update a custom avatar, click the speaker label and choose **Update speaker’s avatar**. This updates the avatar across your project while preserving its size, position, and visibility in the scene editor.
To see the entire workflow from start to finish, check out the tutorial video below:
## Save your avatar images
Any avatar image you generate is automatically saved to your **Project files** under **AI Assets > Generated Avatar Images**. You can access them there to reuse or restyle later.
You can also download the image to your device by clicking the **Download** icon.
## Manage or update custom avatars
To update a custom avatar, click the speaker label and choose **Update speaker’s avatar**. This updates the avatar across your project while preserving its size, position, and visibility in the scene editor.
 ## Best practices for using custom avatars
Whether you’re uploading a photo or generating an avatar from a text prompt, use a clear, human-like face with even lighting and a relaxed, natural expression. Avoid using images or prompts that include animals, objects, or abstract characters—they won’t animate reliably.
### Head position and framing
| Attribute | Best practices |
| ----------------- | ------------------------------------------------------------------------------------------------------------------ |
| **Framing** | Use a close-up headshot with shoulders slightly visible. The subject should be centered and squared to the camera. |
| **Head position** | Face forward with the head upright. Avoid angled or three-quarter views that distort motion. |
### Glasses, mouth, and eyes
| Attribute | Best practices |
| ----------- | ----------------------------------------------------------------------------------------- |
| **Glasses** | Avoid heavy reflections. Eyes must be clearly visible. |
| **Mouth** | Ensure the mouth is unobstructed so the AI can sync lip shapes accurately. |
| **Eyes** | Eyes must be open and clearly visible. Avoid shadows or squinting that obscure eye shape. |
### Background, foreground, and lighting
| Attribute | Best practices |
| -------------------------- | -------------------------------------------------------------------------------------------- |
| **Background** | Remove people or animals in the background. |
| **Transparent background** | Using images with background transparency may result in a blurred or low-quality background. |
| **Foreground** | Keep the subject unobstructed. Avoid props or objects that block the face or shoulders. |
| **Lighting** | Use soft, even lighting to avoid harsh shadows. |
| **Contrast** | Ensure good contrast between the subject and background for clean separation. |
### File upload requirements
| Attribute | Best practices |
| ----------------- | ----------------------------------------------------------------------------------------------------------------------------------------------------------------------------------------------------- |
| **Image content** | Images may be rejected if they contain celebrities, minors, or inappropriate content such as nudity or explicit material. Both uploaded photos and AI-generated images must pass safety requirements. |
| **File types** | Supported formats: JPEG, PNG, and WEBP. |
| **File size** | Maximum file size is 10 MB. |
| **Aspect ratio** | For best results when uploading images for custom avatars, use widescreen horizontal photos (16:9). Tall portrait images (9:16) or other non-standard ratios may not display correctly. |
## Best practices for using custom avatars
Whether you’re uploading a photo or generating an avatar from a text prompt, use a clear, human-like face with even lighting and a relaxed, natural expression. Avoid using images or prompts that include animals, objects, or abstract characters—they won’t animate reliably.
### Head position and framing
| Attribute | Best practices |
| ----------------- | ------------------------------------------------------------------------------------------------------------------ |
| **Framing** | Use a close-up headshot with shoulders slightly visible. The subject should be centered and squared to the camera. |
| **Head position** | Face forward with the head upright. Avoid angled or three-quarter views that distort motion. |
### Glasses, mouth, and eyes
| Attribute | Best practices |
| ----------- | ----------------------------------------------------------------------------------------- |
| **Glasses** | Avoid heavy reflections. Eyes must be clearly visible. |
| **Mouth** | Ensure the mouth is unobstructed so the AI can sync lip shapes accurately. |
| **Eyes** | Eyes must be open and clearly visible. Avoid shadows or squinting that obscure eye shape. |
### Background, foreground, and lighting
| Attribute | Best practices |
| -------------------------- | -------------------------------------------------------------------------------------------- |
| **Background** | Remove people or animals in the background. |
| **Transparent background** | Using images with background transparency may result in a blurred or low-quality background. |
| **Foreground** | Keep the subject unobstructed. Avoid props or objects that block the face or shoulders. |
| **Lighting** | Use soft, even lighting to avoid harsh shadows. |
| **Contrast** | Ensure good contrast between the subject and background for clean separation. |
### File upload requirements
| Attribute | Best practices |
| ----------------- | ----------------------------------------------------------------------------------------------------------------------------------------------------------------------------------------------------- |
| **Image content** | Images may be rejected if they contain celebrities, minors, or inappropriate content such as nudity or explicit material. Both uploaded photos and AI-generated images must pass safety requirements. |
| **File types** | Supported formats: JPEG, PNG, and WEBP. |
| **File size** | Maximum file size is 10 MB. |
| **Aspect ratio** | For best results when uploading images for custom avatars, use widescreen horizontal photos (16:9). Tall portrait images (9:16) or other non-standard ratios may not display correctly. |