> ## Documentation Index
> Fetch the complete documentation index at: https://help.descript.com/llms.txt
> Use this file to discover all available pages before exploring further.
# Create your avatar
> Create a Descript avatar from a text prompt, a photo, or the stock gallery.
export const Wistia = ({id, title = "Video", ratio = "16 / 9"}) =>
;
Create an avatar three different ways: from a text prompt, with a reference image, or from Descript's library of premade avatars.
**Before you start:** your script needs a speaker to attach an avatar to. Get your content into Descript first: [record it](/record/editor-recorder-overview), generate it with [text-to-speech](/ai-speech/tts), or [import it](/getting-started/import-overview). Then add a speaker label.
Select a tab below to view step-by-step instructions.
Describe your avatar to generate a completely custom character to present your content.
On current plans, this feature uses AI credits. Learn more about [tracking your media minutes and AI credits](/billing-payments-plans/track-and-understand-your-media-minutes-and-ai-credits).
Legacy and Sunset plans track usage differently. See [Understanding your Legacy and Sunset plan](/billing-payments-plans/legacy-sunset) for details.
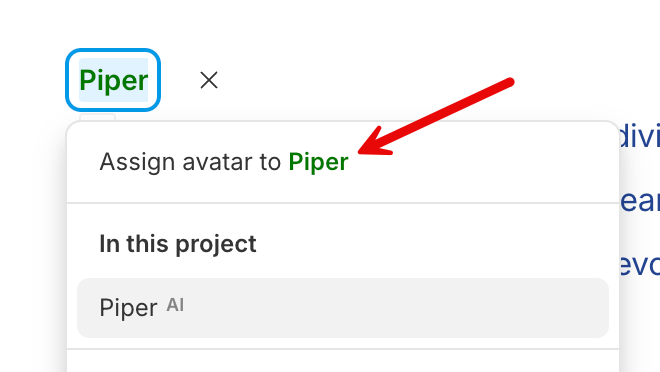
1. Click the speaker label and choose **Assign avatar to \[speaker name]**.
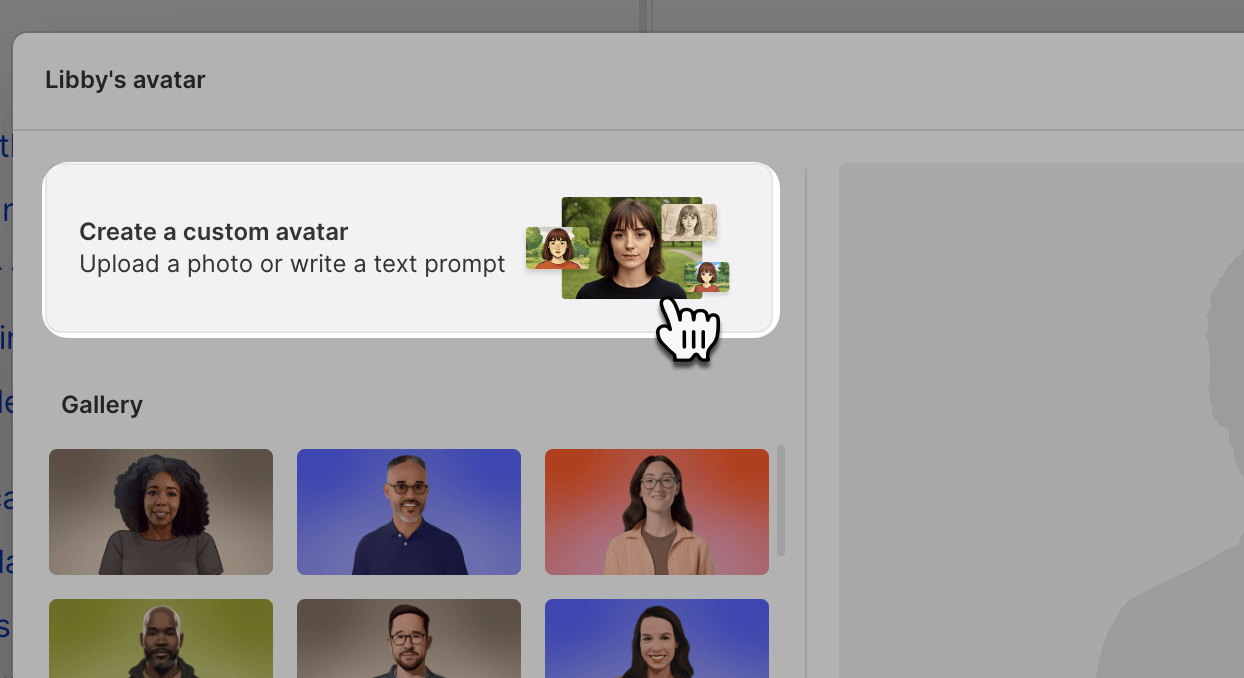
 2. Click the **Create a custom avatar button**.
 3. In the **Text prompt** tab, enter a description or click **Inspire** for a suggested prompt. Describe a realistic, adult, non-celebrity, human-like figure.
4. (Optional) Choose a style for your avatar from the available options in our [style library.](/generative-media/style-library)
5. Descript will generate three avatar options.
* Select one of the images to apply,
* Continue iterating on your prompt (previous generations stay visible while the avatar modal is open), or
* Add a reference image to keep the same base while changing the look: hover the preview and click **Add image to prompt** to generate from both your prompt and the image.
3. In the **Text prompt** tab, enter a description or click **Inspire** for a suggested prompt. Describe a realistic, adult, non-celebrity, human-like figure.
4. (Optional) Choose a style for your avatar from the available options in our [style library.](/generative-media/style-library)
5. Descript will generate three avatar options.
* Select one of the images to apply,
* Continue iterating on your prompt (previous generations stay visible while the avatar modal is open), or
* Add a reference image to keep the same base while changing the look: hover the preview and click **Add image to prompt** to generate from both your prompt and the image.
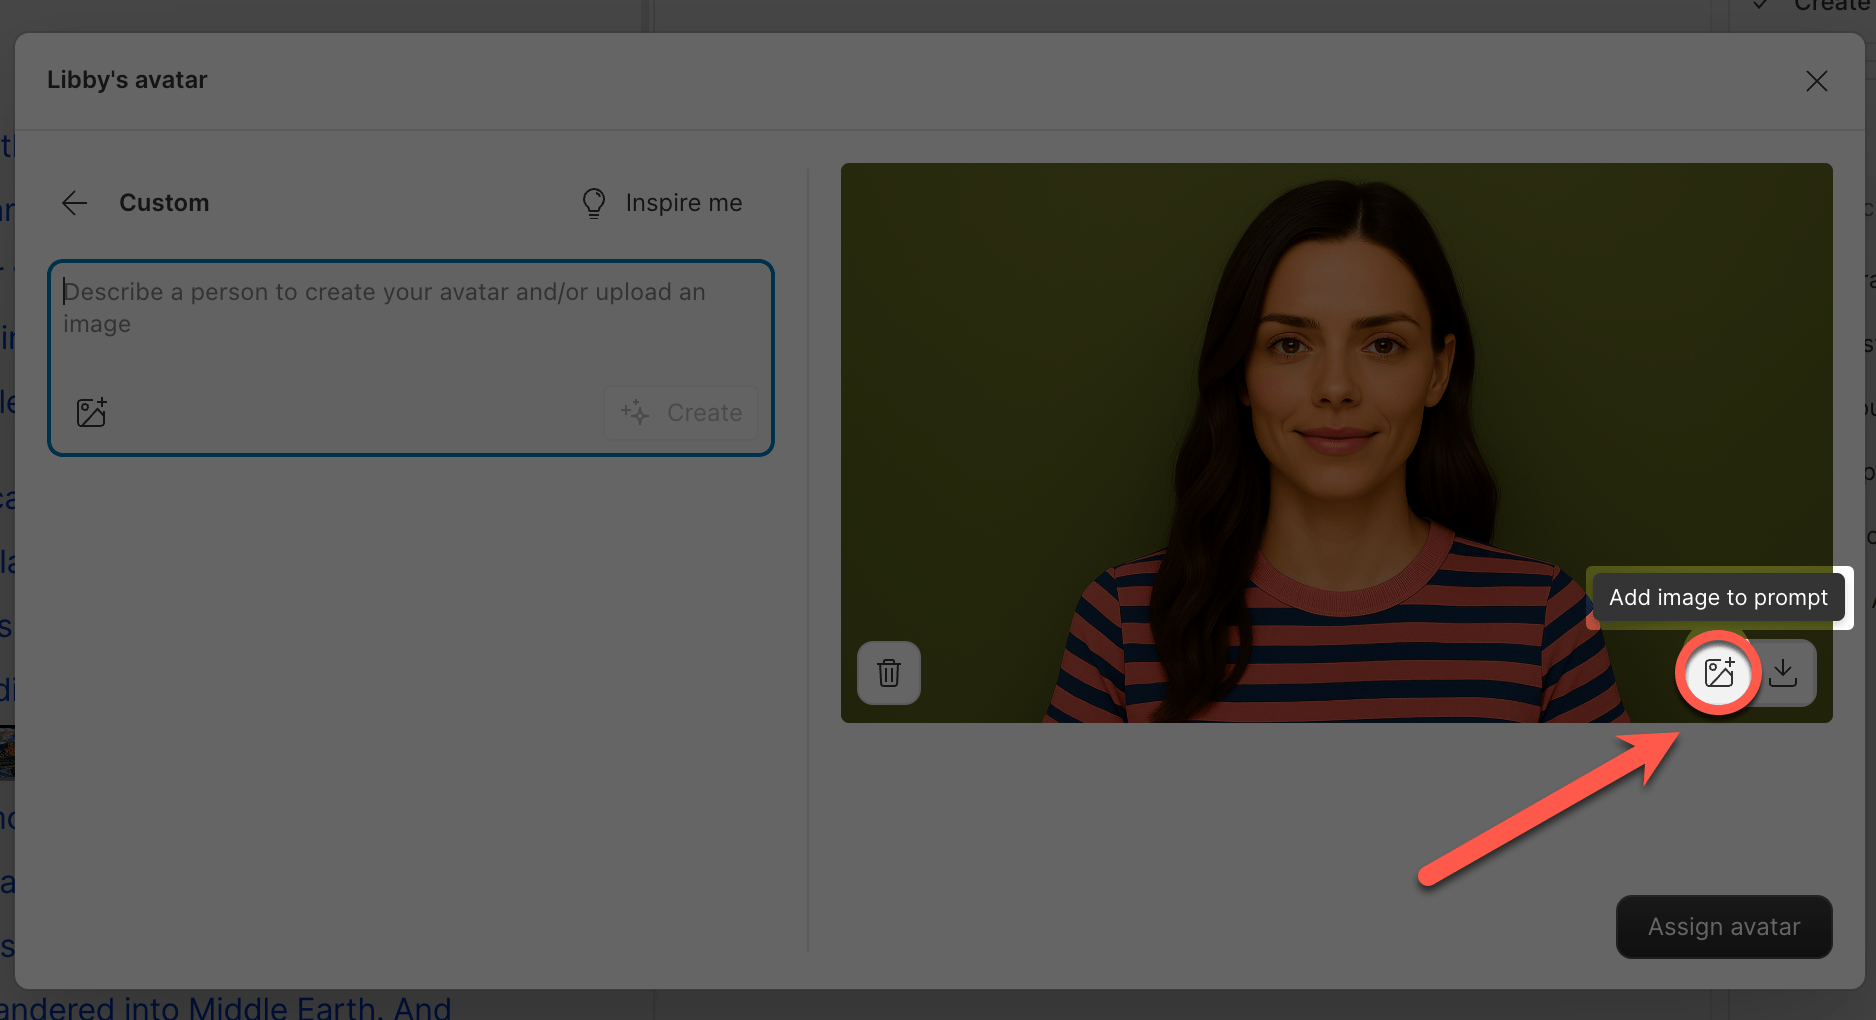 6. Click **Assign avatar** to create the avatar and assign it to your speaker.
7. Once your script is finalized, click **Generate avatar** to animate the image and sync it with the speech audio.
Upload a photo to use as your avatar.
On current plans, this feature uses AI credits. Learn more about [tracking your media minutes and AI credits](/billing-payments-plans/track-and-understand-your-media-minutes-and-ai-credits).
Legacy and Sunset plans track usage differently. See [Understanding your Legacy and Sunset plan](/billing-payments-plans/legacy-sunset) for details.
1. Click the speaker label and choose **Assign avatar to \[speaker name]**.
2. Click the **Create a custom avatar button**.
3. Click the **Upload an image** button and select a supported image file (`.jpeg`, `.png`, or `.webp`).
6. Click **Assign avatar** to create the avatar and assign it to your speaker.
7. Once your script is finalized, click **Generate avatar** to animate the image and sync it with the speech audio.
Upload a photo to use as your avatar.
On current plans, this feature uses AI credits. Learn more about [tracking your media minutes and AI credits](/billing-payments-plans/track-and-understand-your-media-minutes-and-ai-credits).
Legacy and Sunset plans track usage differently. See [Understanding your Legacy and Sunset plan](/billing-payments-plans/legacy-sunset) for details.
1. Click the speaker label and choose **Assign avatar to \[speaker name]**.
2. Click the **Create a custom avatar button**.
3. Click the **Upload an image** button and select a supported image file (`.jpeg`, `.png`, or `.webp`).
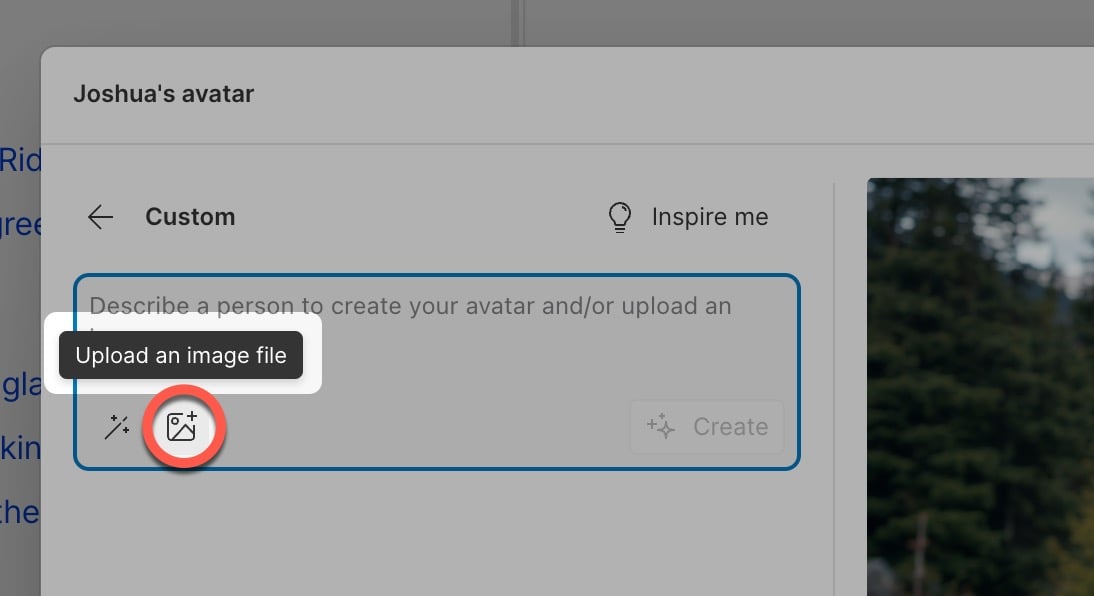 4. Click the **Create** button to complete the upload.
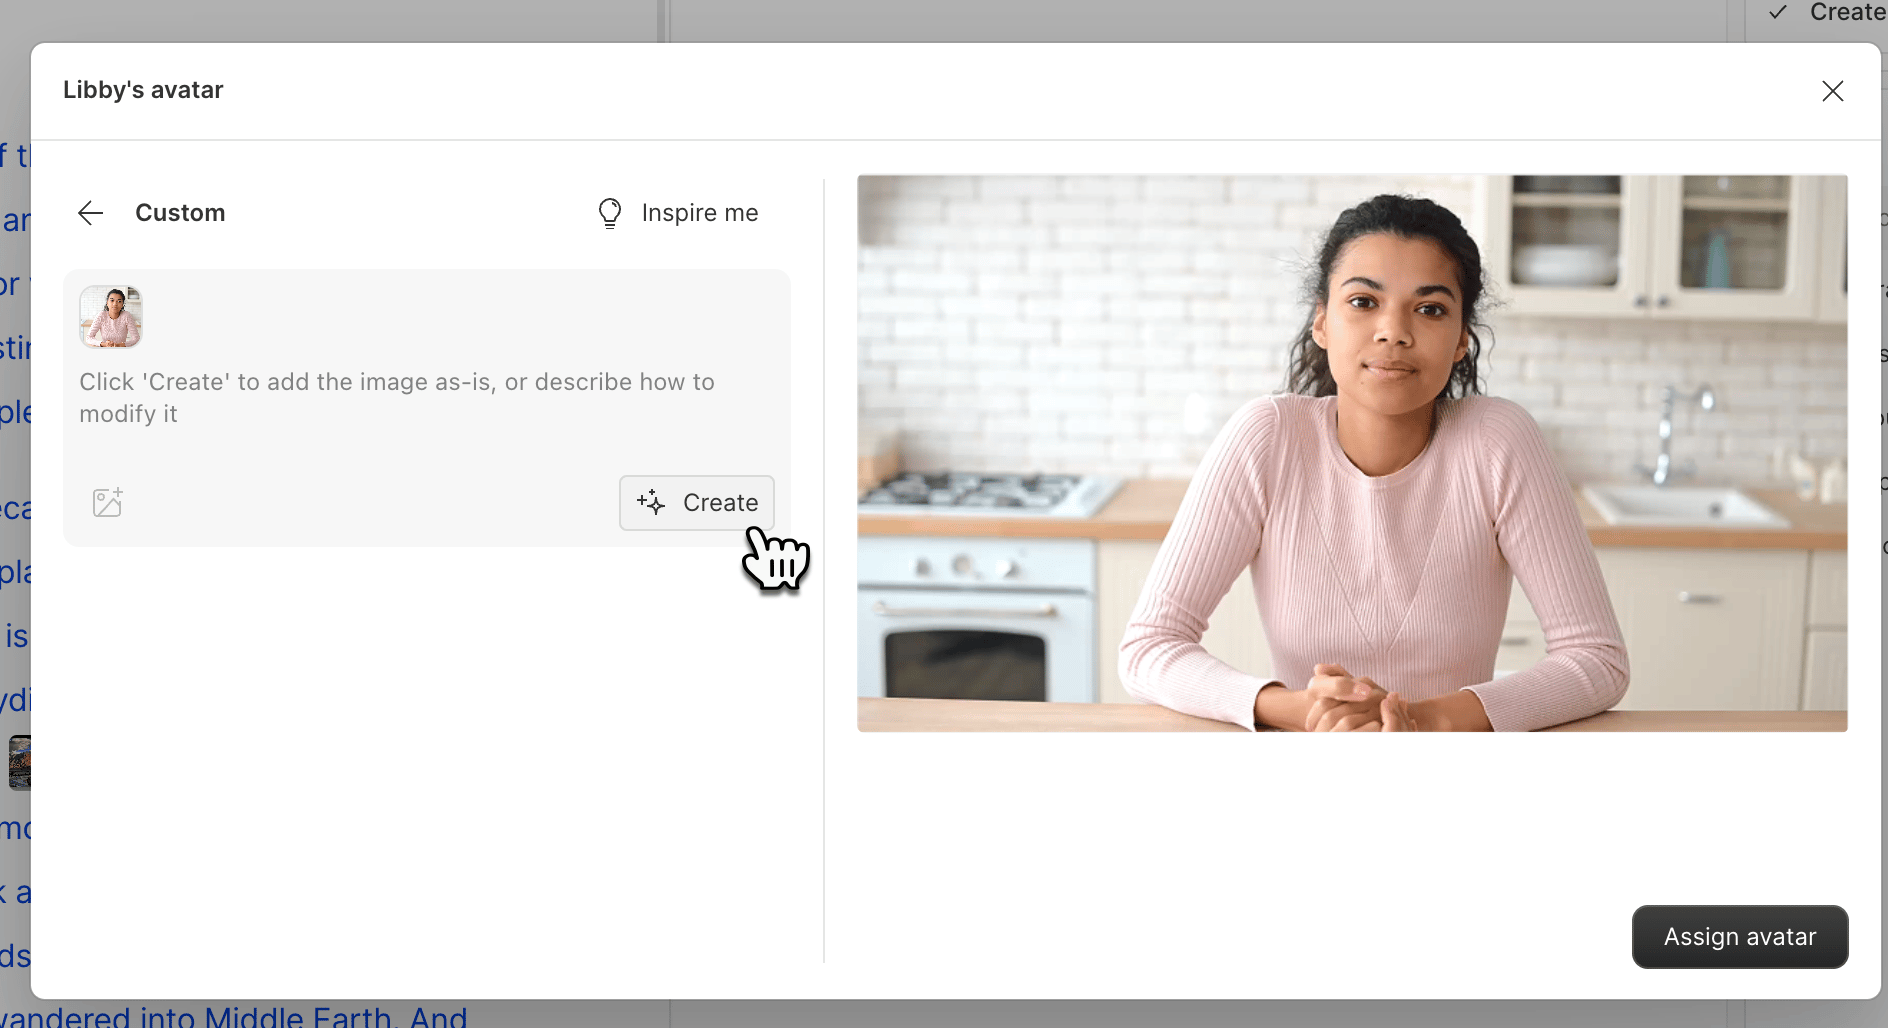 5. If you have no additional changes to make, click the **Assign avatar** button in the bottom right-hand corner.
1. To restyle the photo instead, hover the preview and click **Add image to prompt**, then add a description — Descript generates from both your photo and your prompt.
Uploaded photos can be up to 10 MB and look best in widescreen (16:9). Like AI-generated images, they pass safety checks and may be rejected if they contain celebrities, minors, or explicit content.
For reliable animation, use a clear, human-like face with even lighting and a relaxed, natural expression. Avoid animals, objects, or abstract characters.
* **Framing:** a close-up headshot, centered and squared to the camera, shoulders slightly visible, with nothing blocking the face.
* **Head and face:** upright and forward-facing, not angled; eyes open and clearly visible; mouth unobstructed for accurate lip sync; glasses without heavy reflections.
* **Background:** simple, uncluttered, and well-contrasted, with no other people or animals. Avoid transparency.
* **Lighting:** soft and even, with no harsh shadows.
Skip the generation and pick a ready-made avatar from Descript's gallery.
1. Click the speaker label and choose **Assign avatar to \[speaker name]**.
2. In the gallery, browse and select a stock avatar.
5. If you have no additional changes to make, click the **Assign avatar** button in the bottom right-hand corner.
1. To restyle the photo instead, hover the preview and click **Add image to prompt**, then add a description — Descript generates from both your photo and your prompt.
Uploaded photos can be up to 10 MB and look best in widescreen (16:9). Like AI-generated images, they pass safety checks and may be rejected if they contain celebrities, minors, or explicit content.
For reliable animation, use a clear, human-like face with even lighting and a relaxed, natural expression. Avoid animals, objects, or abstract characters.
* **Framing:** a close-up headshot, centered and squared to the camera, shoulders slightly visible, with nothing blocking the face.
* **Head and face:** upright and forward-facing, not angled; eyes open and clearly visible; mouth unobstructed for accurate lip sync; glasses without heavy reflections.
* **Background:** simple, uncluttered, and well-contrasted, with no other people or animals. Avoid transparency.
* **Lighting:** soft and even, with no harsh shadows.
Skip the generation and pick a ready-made avatar from Descript's gallery.
1. Click the speaker label and choose **Assign avatar to \[speaker name]**.
2. In the gallery, browse and select a stock avatar.
 3. Click **Assign avatar** to confirm your selection.
4. Once your script is finalized, click **Generate avatar** to animate it and sync it with the speech audio.
## Manage avatars in your project
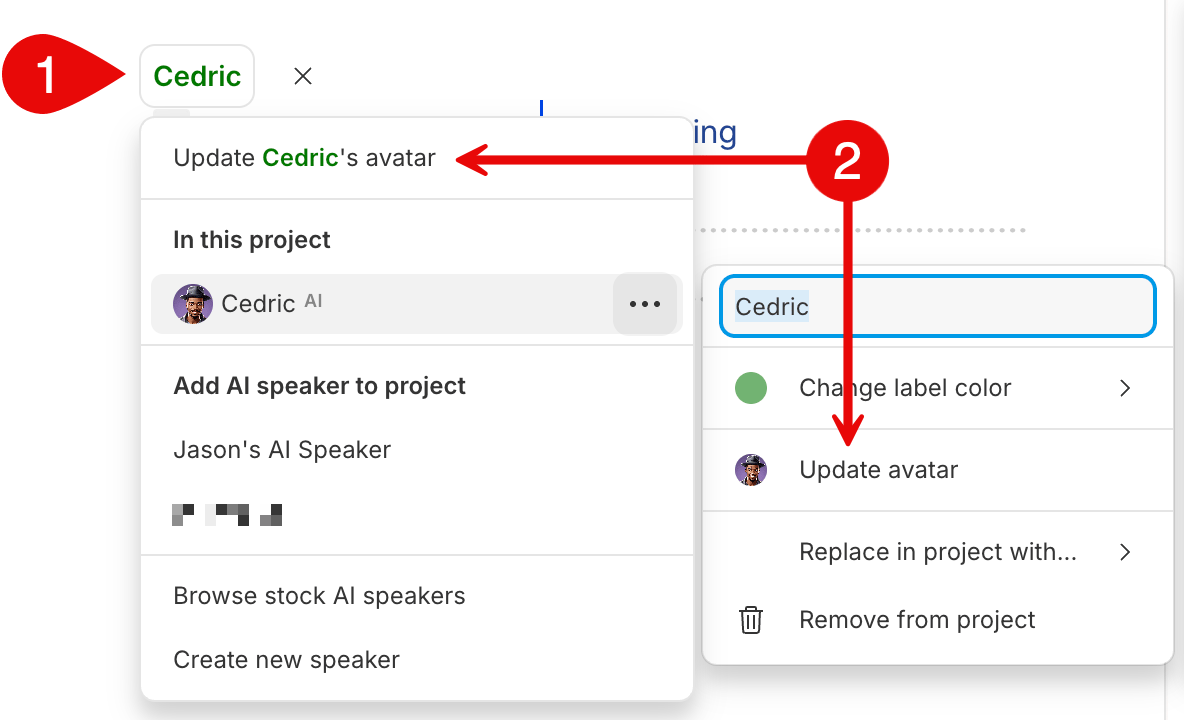
Once assigned, an avatar "follows" its speaker everywhere they appear in your composition. Each speaker can be connected to one avatar at a time. From the speaker label you can:
* Update or remove the avatar by choosing **Update speaker's avatar**.
* Resize, reposition, or crop it in the [Scene panel](/visuals/layer-properties).
* Combine it with effects like [Green Screen](/effects-animations-transitions/green-screen).
3. Click **Assign avatar** to confirm your selection.
4. Once your script is finalized, click **Generate avatar** to animate it and sync it with the speech audio.
## Manage avatars in your project
Once assigned, an avatar "follows" its speaker everywhere they appear in your composition. Each speaker can be connected to one avatar at a time. From the speaker label you can:
* Update or remove the avatar by choosing **Update speaker's avatar**.
* Resize, reposition, or crop it in the [Scene panel](/visuals/layer-properties).
* Combine it with effects like [Green Screen](/effects-animations-transitions/green-screen).
 ## Save your avatar images
Any avatar image you generate is automatically saved to your **Project files** under **AI Assets > Generated Avatar Images**. Download the image to your device by clicking the **Download** icon.
## Related topics
- [Avatars overview](/generative-media/overview.md)
- [Create Clips from your content](/repurpose/create-clips-from-your-content.md)
- [Create and edit organizations](/squadcast/organizations.md)
- [Create your Descript account](/getting-started/create-account.md)
- [Create and save your own templates](/templates-and-presets/custom-templates.md)
## Save your avatar images
Any avatar image you generate is automatically saved to your **Project files** under **AI Assets > Generated Avatar Images**. Download the image to your device by clicking the **Download** icon.
## Related topics
- [Avatars overview](/generative-media/overview.md)
- [Create Clips from your content](/repurpose/create-clips-from-your-content.md)
- [Create and edit organizations](/squadcast/organizations.md)
- [Create your Descript account](/getting-started/create-account.md)
- [Create and save your own templates](/templates-and-presets/custom-templates.md)