> ## Documentation Index
> Fetch the complete documentation index at: https://help.descript.com/llms.txt
> Use this file to discover all available pages before exploring further.
# Transitions
> Descript offers a library of clip and scene transitons: wipes, fades, cross-zoom and more.
Transitions are visual effects that smooth the start, end, or change between media in your project. Apply them between [scenes](/getting-started/scenes) and/or [individual clips](/visuals/working-with-layers-and-clips-overview) in your composition.
Descript has two kinds of transitions:
* **Scene transitions:** applied at the boundary between two scenes. They affect all visuals in the scene at once and are selected from the transitions picker.
* **Clip transitions:** applied to individual clips within a scene directly from the timeline.
If you're new to scenes, check out the [Scenes overview guide](/getting-started/scenes) first.
**Smart Transitions**
By default, Descript automatically applies [Smart Transitions](/effects-animations-transitions/smart-transitions) between scenes when you add new content. This article covers how to apply and customize transitions manually.
## Apply a transition to a scene
Scene transitions play at the boundary between two scenes.
**To apply or adjust a scene transition:**
1. Click a scene thumbnail in the script panel. In the hover menu that appears, click the hourglass icon.
* Not seeing the hourglass icon? You may need to unfocus the current scene first. Click the white space around the scene editor — the transition icons between scenes should then appear in the timeline.
2. The transitions picker opens as a visual grid. Hover over any thumbnail to preview the transition, then click to apply.
3. (Optional) Adjust the options and parameters for the transition. Available settings vary by transition type and may include:
* **Duration:** how long the transition takes to play
* **Direction:** which way the transition moves
* **Feather:** how soft or sharp the transition edge appears
* **Easing:** how the transition accelerates or decelerates over time
4. (Optional) Click **Apply to all** to apply your transition to all scenes in the composition. This replaces all existing scene transitions with the selected type.
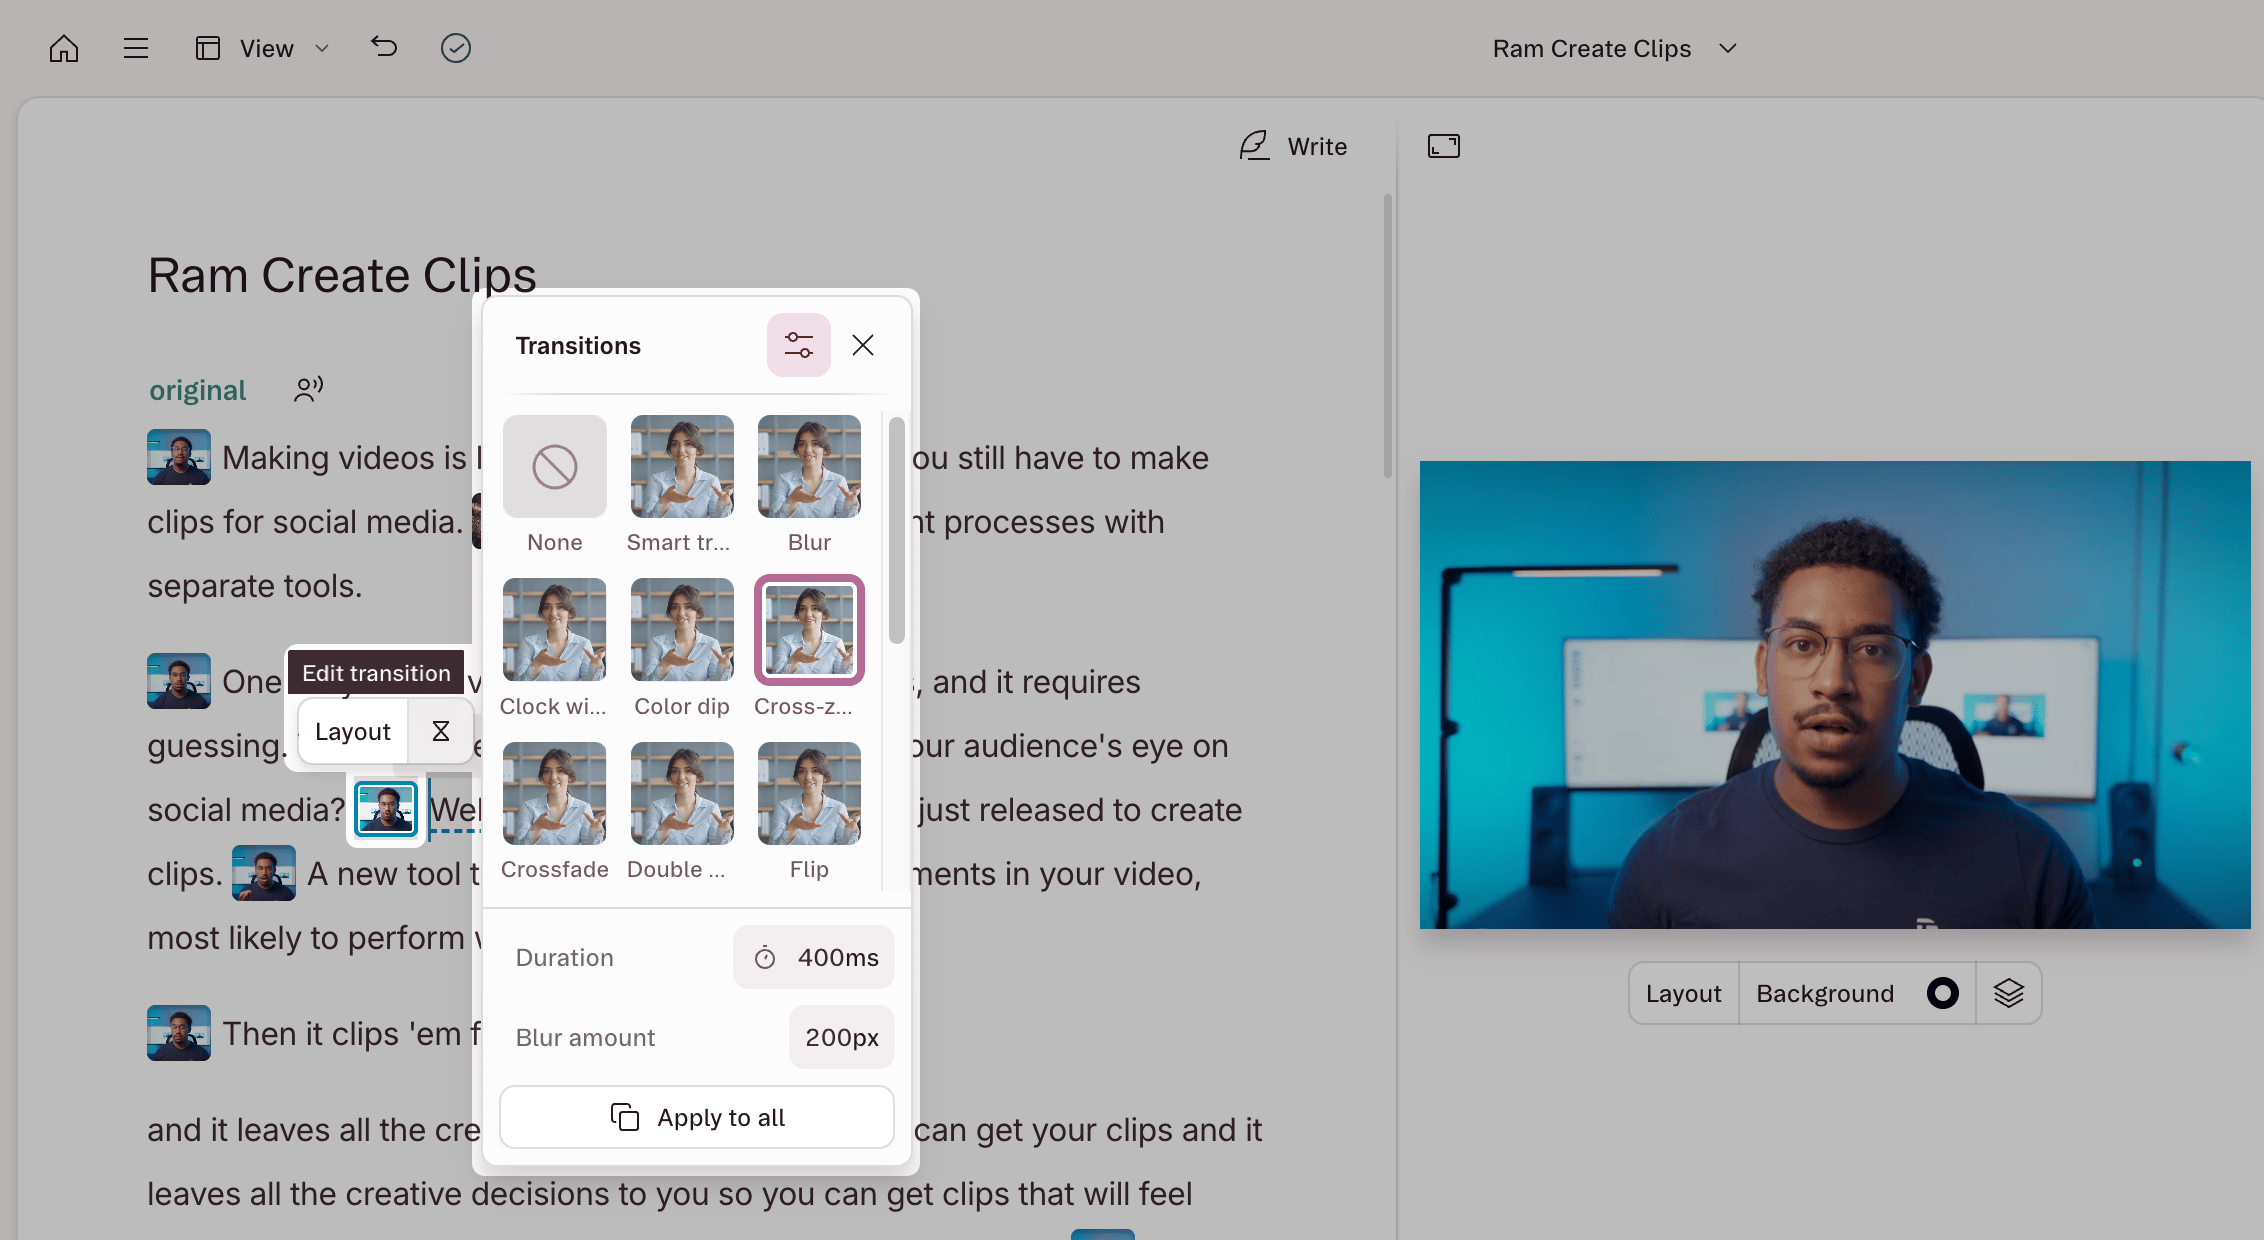 You can also access the transitions picker via the Scene properties panel or the timeline:
* **Timeline:** Click the transition icon between two scene thumbnails at the top of the timeline.
* **Properties panel:** Select a scene, then go to the **Transitions** section in the right-hand sidebar.
| Transition | What it does |
| ---------------- | ------------------------------------------------------------------------------------------------------------------------------------------ |
| None | No effect — playback cuts directly from one scene to the next |
| Smart Transition | Automatically rearranges, zooms, and fades elements for a polished look. [Learn more →](/effects-animations-transitions/smart-transitions) |
| Blur | Blurs between the two scenes during the transition |
| Clock Wipe | Sweeps the next scene in with a clockwise or counterclockwise motion |
| Color Dip | Briefly transitions through a solid color between scenes |
| Crossfade | Both scenes are visible simultaneously as one fades out and the other fades in |
| Fade | Fades the scene in or out |
| Cross-zoom | Zooms into the outgoing scene while zooming out from the incoming scene |
| Double Wipe | Two wipes move simultaneously from opposite edges |
| Flip | Flips the scene horizontally or vertically to reveal the next |
| Move Out | The incoming scene slides in as the outgoing scene moves out |
| Push-Pull | One scene pushes the other off screen |
| Scale | Scales the scene up or down during the transition |
| Shake | Briefly shakes the scene before cutting to the next |
| Shape Wipe | Reveals the next scene through a shape — circle, square, triangle, and more |
| Split | Splits the scene horizontally or vertically to reveal the next |
| Wipe | Wipes from one scene to the next in a set direction |
## Remove a scene transition
Open the transitions picker and select **None**. Playback will cut directly from one scene to the next with no visual effect.
## Apply a transition to a clip
Clip transitions are independent of scene transitions — they apply to individual [clips](/visuals/working-with-layers-and-clips-overview) within a scene and are set separately from the timeline. Clip transitions have a separate set of options from scene transitions.
1. Expand the timeline (click and drag up) to display your clips.
2. Select a clip. A small white dot — the transition **Handle** — appears at the clip's edge. Click and drag the handle to apply a fade, or click it to open the clip transition menu.
3. Select a transition from the menu, then adjust the duration, loops, and fade direction as needed.
4. Use the **Play** button in the top-right corner of the menu to preview.
To adjust a clip transition after applying it, click the transition handle again to reopen the menu and update its settings.
## Crossfade and cross-zoom
**Crossfade and cross-zoom** are unique transitions. They create a moment of overlap where the first clip or scene fades out as the second fades in. For these transitions to work properly, each clip needs extra footage beyond its visible start or end point to draw from during the overlap.
### Why isn't crossfade available?
If a clip is trimmed to the very start or end of its source file, there's no extra footage to work with — crossfade and cross-zoom won't be available. Trim one or both clips to make room. [Learn how to trim a clip.](/visuals/working-with-layers-and-clips-overview#trim-a-clip-or-layer)
### Crossfade clips on separate layers
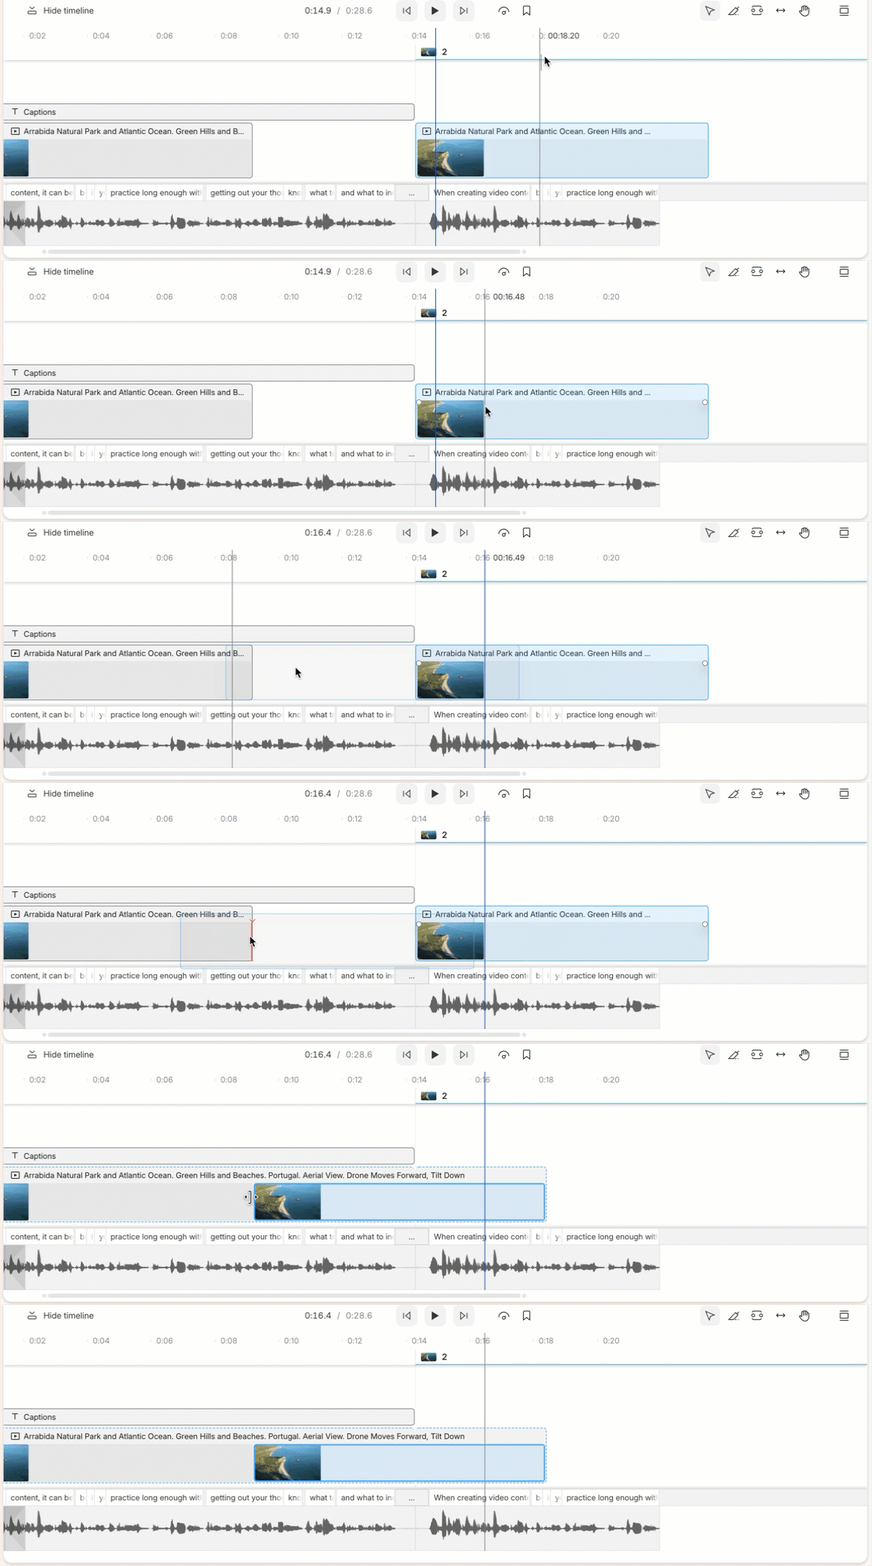
To crossfade two clips, they must be on the same layer. Drag one clip onto the other until a red line appears, then release to combine them. Apply the crossfade as usual.
You can also access the transitions picker via the Scene properties panel or the timeline:
* **Timeline:** Click the transition icon between two scene thumbnails at the top of the timeline.
* **Properties panel:** Select a scene, then go to the **Transitions** section in the right-hand sidebar.
| Transition | What it does |
| ---------------- | ------------------------------------------------------------------------------------------------------------------------------------------ |
| None | No effect — playback cuts directly from one scene to the next |
| Smart Transition | Automatically rearranges, zooms, and fades elements for a polished look. [Learn more →](/effects-animations-transitions/smart-transitions) |
| Blur | Blurs between the two scenes during the transition |
| Clock Wipe | Sweeps the next scene in with a clockwise or counterclockwise motion |
| Color Dip | Briefly transitions through a solid color between scenes |
| Crossfade | Both scenes are visible simultaneously as one fades out and the other fades in |
| Fade | Fades the scene in or out |
| Cross-zoom | Zooms into the outgoing scene while zooming out from the incoming scene |
| Double Wipe | Two wipes move simultaneously from opposite edges |
| Flip | Flips the scene horizontally or vertically to reveal the next |
| Move Out | The incoming scene slides in as the outgoing scene moves out |
| Push-Pull | One scene pushes the other off screen |
| Scale | Scales the scene up or down during the transition |
| Shake | Briefly shakes the scene before cutting to the next |
| Shape Wipe | Reveals the next scene through a shape — circle, square, triangle, and more |
| Split | Splits the scene horizontally or vertically to reveal the next |
| Wipe | Wipes from one scene to the next in a set direction |
## Remove a scene transition
Open the transitions picker and select **None**. Playback will cut directly from one scene to the next with no visual effect.
## Apply a transition to a clip
Clip transitions are independent of scene transitions — they apply to individual [clips](/visuals/working-with-layers-and-clips-overview) within a scene and are set separately from the timeline. Clip transitions have a separate set of options from scene transitions.
1. Expand the timeline (click and drag up) to display your clips.
2. Select a clip. A small white dot — the transition **Handle** — appears at the clip's edge. Click and drag the handle to apply a fade, or click it to open the clip transition menu.
3. Select a transition from the menu, then adjust the duration, loops, and fade direction as needed.
4. Use the **Play** button in the top-right corner of the menu to preview.
To adjust a clip transition after applying it, click the transition handle again to reopen the menu and update its settings.
## Crossfade and cross-zoom
**Crossfade and cross-zoom** are unique transitions. They create a moment of overlap where the first clip or scene fades out as the second fades in. For these transitions to work properly, each clip needs extra footage beyond its visible start or end point to draw from during the overlap.
### Why isn't crossfade available?
If a clip is trimmed to the very start or end of its source file, there's no extra footage to work with — crossfade and cross-zoom won't be available. Trim one or both clips to make room. [Learn how to trim a clip.](/visuals/working-with-layers-and-clips-overview#trim-a-clip-or-layer)
### Crossfade clips on separate layers
To crossfade two clips, they must be on the same layer. Drag one clip onto the other until a red line appears, then release to combine them. Apply the crossfade as usual.
 ## Known limitations
**Transitions don't work across ignored text**
If you have [ignored (strikethrough) text](/script-editing/delete-vs-ignore) between two scenes, Descript can't render the transition. The ignored content still exists in the timeline structure even though it's skipped during playback. Select the ignored text and press **Delete** to remove it completely — the transition should work once it's gone.
**Transitions between very short scenes may not be visible**
If the scenes on either side of a transition are very short, the effect may not have enough time to play. Try shortening the transition duration or lengthening the surrounding scenes.
**Transitions between scenes with identical content may be imperceptible**
If two adjacent scenes share the same visual content, some transitions may be difficult to notice. Try using a more visually distinct transition type (such as a wipe or push-pull) or adjusting the content between scenes to make the change more apparent.
**Cannot insert into layer or clip that ends at scene boundary**
If you see "Cannot insert into layer or clip that ends at scene boundary," the clip ends exactly where the scene does — leaving no room for the crossfade to extend. Trim one or both clips to fix this.
## Known limitations
**Transitions don't work across ignored text**
If you have [ignored (strikethrough) text](/script-editing/delete-vs-ignore) between two scenes, Descript can't render the transition. The ignored content still exists in the timeline structure even though it's skipped during playback. Select the ignored text and press **Delete** to remove it completely — the transition should work once it's gone.
**Transitions between very short scenes may not be visible**
If the scenes on either side of a transition are very short, the effect may not have enough time to play. Try shortening the transition duration or lengthening the surrounding scenes.
**Transitions between scenes with identical content may be imperceptible**
If two adjacent scenes share the same visual content, some transitions may be difficult to notice. Try using a more visually distinct transition type (such as a wipe or push-pull) or adjusting the content between scenes to make the change more apparent.
**Cannot insert into layer or clip that ends at scene boundary**
If you see "Cannot insert into layer or clip that ends at scene boundary," the clip ends exactly where the scene does — leaving no room for the crossfade to extend. Trim one or both clips to fix this.