> ## Documentation Index
> Fetch the complete documentation index at: https://help.descript.com/llms.txt
> Use this file to discover all available pages before exploring further.
# Color Adjustments
> Fine-tune the look of your images, videos, and scenes using color adjustments and preset filters.
Push exposure, contrast, and white balance to fix how a shot looks, or drop on a preset filter for an instant stylized grade.
**Properties panel behavior**
The panel is context-aware and updates based on what you have selected—showing either scene-level or layer-level options. If the effect options you expect aren’t visible, check which item is selected in the Layer list. [Learn more about how the Properties panel works](/descript-tour/properties-panel).
## Apply a color preset
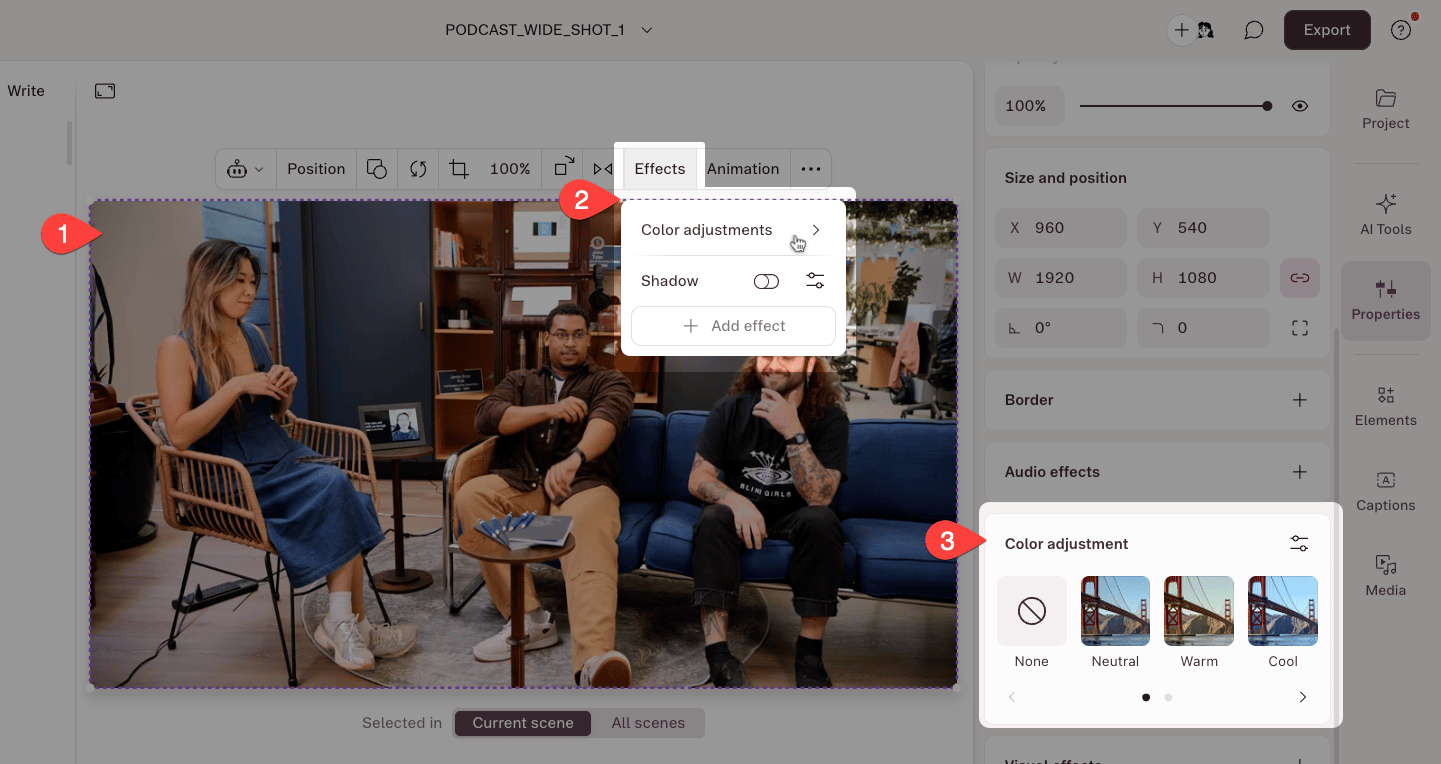
1. Select an image, video, or avatar layer in your Scene Editor.
2. In the hover toolbar that appears, click **Color Adjustments** in the **Effects** menu. This opens the **Color Adjustments** section in [the Properties Panel](/descript-tour/properties-panel).
3. Browse the filter thumbnails in the carousel. Click a filter thumbnail to apply it.
To remove a filter, click the **None** preset button. This resets all color sliders to their defaults.
 ## Adjust white balance
White balance helps correct color casts in your footage. For example, it can help you adjust overly blue indoor footage or orange-tinted lighting to make it look more natural.
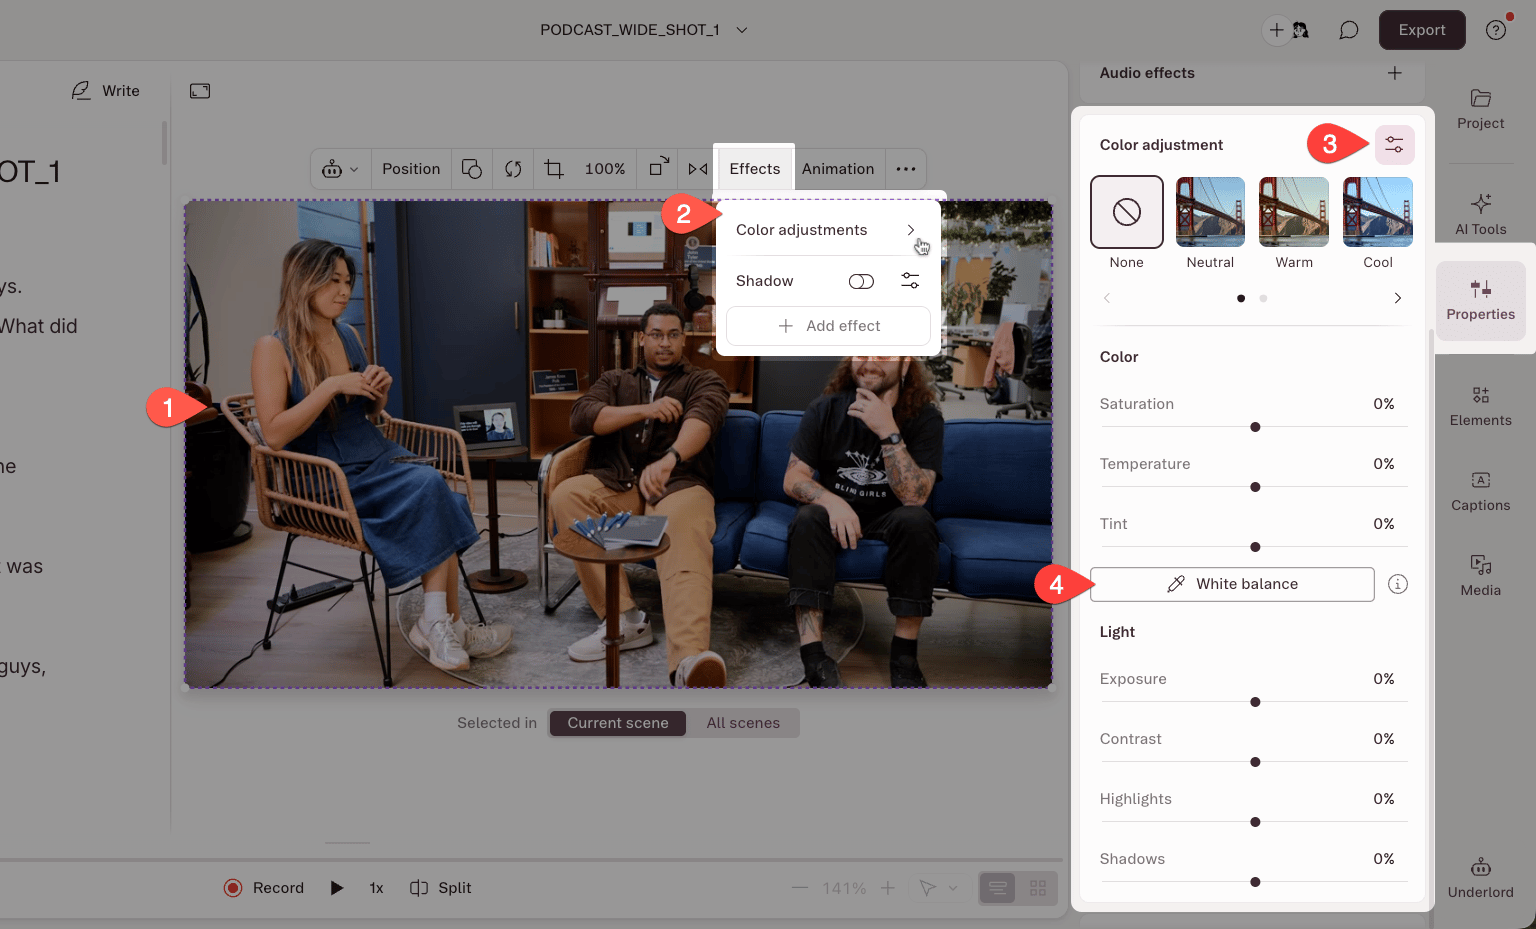
1. Select an image, video, or avatar layer.
2. In the hover toolbar, click **Color Adjustments** in the **Effects** menu to open the Color Adjustments section.
3. Click **More controls**, then click the **White Balance** button.
4. Click an area in your image or video that should be neutral (white or gray). Descript automatically adjusts the white balance based on your selection.
## Adjust white balance
White balance helps correct color casts in your footage. For example, it can help you adjust overly blue indoor footage or orange-tinted lighting to make it look more natural.
1. Select an image, video, or avatar layer.
2. In the hover toolbar, click **Color Adjustments** in the **Effects** menu to open the Color Adjustments section.
3. Click **More controls**, then click the **White Balance** button.
4. Click an area in your image or video that should be neutral (white or gray). Descript automatically adjusts the white balance based on your selection.
 ## Color parameters
For more precise control, adjust individual color parameters manually.
1. Select a layer.
2. In the hover toolbar, click **Color Adjustments** in the **Effects** menu, then click the **More controls** button in the top right corner.
3. Drag any slider to adjust its value. To reset a single slider, double-click it to return it to the default.
## Apply to all scenes
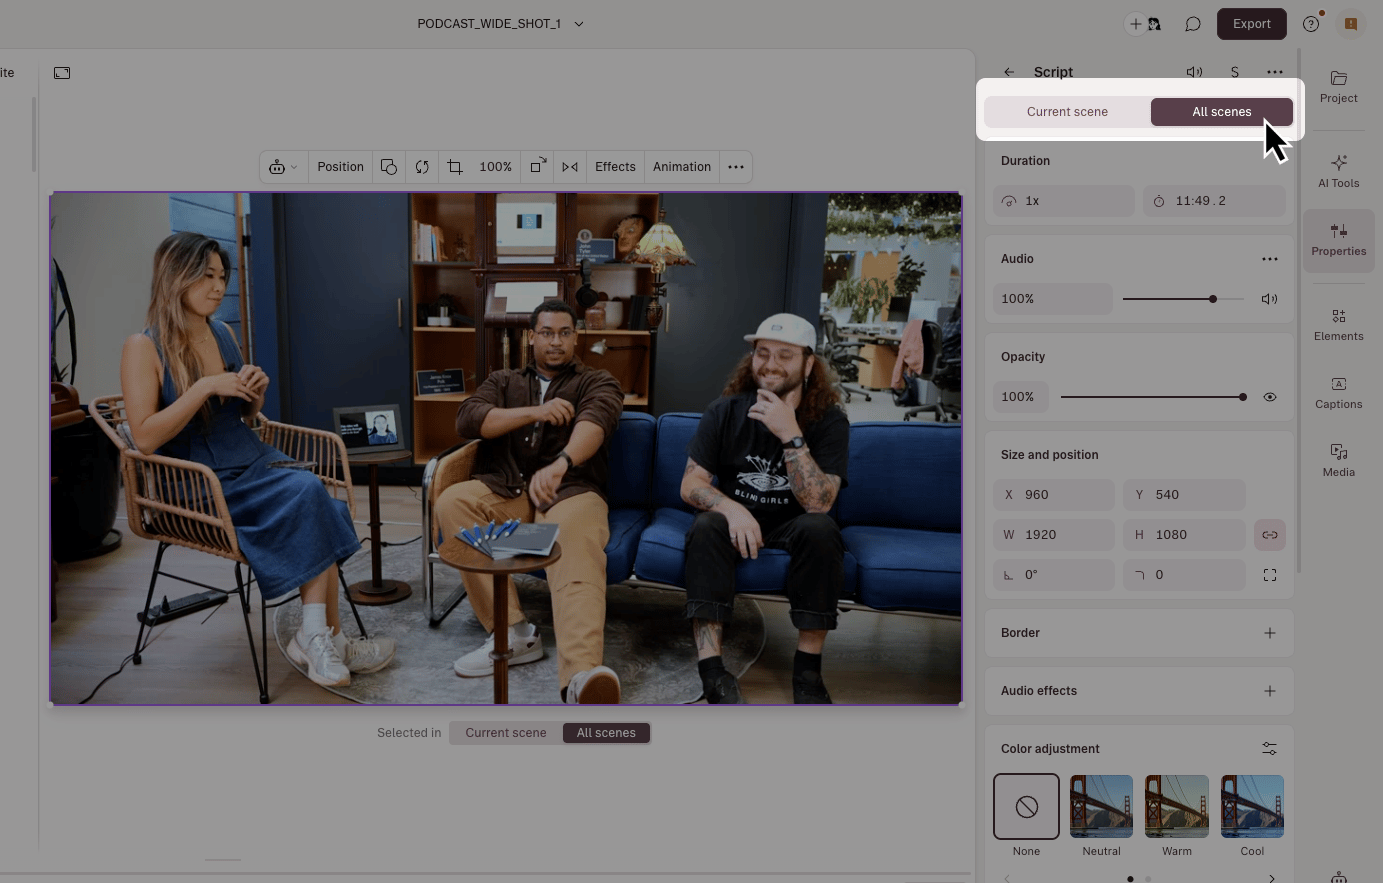
Color adjustments apply to the current scene by default. To apply your adjustments across all scenes at once, select the **All Scenes** toggle at the top of the Properties Panel *before* applying a color adjustment effect.
## Color parameters
For more precise control, adjust individual color parameters manually.
1. Select a layer.
2. In the hover toolbar, click **Color Adjustments** in the **Effects** menu, then click the **More controls** button in the top right corner.
3. Drag any slider to adjust its value. To reset a single slider, double-click it to return it to the default.
## Apply to all scenes
Color adjustments apply to the current scene by default. To apply your adjustments across all scenes at once, select the **All Scenes** toggle at the top of the Properties Panel *before* applying a color adjustment effect.
 ## Presets reference
| Filter | Description |
| ------------------- | ---------------------------------------------------------------------------------------- |
| **Neutral** | Subtle enhancement for a balanced, true-to-life look |
| **Warm** | Adds warm golden tones |
| **Cool** | Adds cool blue tones |
| **Black and white** | Converts to grayscale |
| **Pop** | Boosts contrast and saturation for a vivid look |
| **Invert** | Inverts all colors — useful for flipping dark logos on light backgrounds (or vice versa) |
## Color parameters reference
| Parameter | What it does | Range |
| --------------- | ----------------------------------------------- | ----------------- |
| **Exposure** | Adjusts overall brightness | Dark ← → Bright |
| **Contrast** | Adjusts difference between light and dark areas | Low ← → High |
| **Highlights** | Adjusts brightness of light areas | Dark ← → Bright |
| **Shadows** | Adjusts brightness of dark areas | Dark ← → Bright |
| **Temperature** | Adjusts warmth or coolness | Cool ← → Warm |
| **Tint** | Adjusts green or magenta balance | Green ← → Magenta |
| **Saturation** | Adjusts color intensity | Muted ← → Vivid |
## Known limitations
* **One filter at a time:** You can't stack multiple filters. Applying a new filter replaces the previous one.
* **Filter presets deselect on manual adjustment.** If you tweak any slider after applying a filter, the filter preset deselects (your slider values stay).
* **Color adjustments are applied last.** When layering multiple effects, color adjustments are always applied after other effects. Learn more about [applying and adjusting effects](/effects-animations-transitions/apply-adjust).
## Presets reference
| Filter | Description |
| ------------------- | ---------------------------------------------------------------------------------------- |
| **Neutral** | Subtle enhancement for a balanced, true-to-life look |
| **Warm** | Adds warm golden tones |
| **Cool** | Adds cool blue tones |
| **Black and white** | Converts to grayscale |
| **Pop** | Boosts contrast and saturation for a vivid look |
| **Invert** | Inverts all colors — useful for flipping dark logos on light backgrounds (or vice versa) |
## Color parameters reference
| Parameter | What it does | Range |
| --------------- | ----------------------------------------------- | ----------------- |
| **Exposure** | Adjusts overall brightness | Dark ← → Bright |
| **Contrast** | Adjusts difference between light and dark areas | Low ← → High |
| **Highlights** | Adjusts brightness of light areas | Dark ← → Bright |
| **Shadows** | Adjusts brightness of dark areas | Dark ← → Bright |
| **Temperature** | Adjusts warmth or coolness | Cool ← → Warm |
| **Tint** | Adjusts green or magenta balance | Green ← → Magenta |
| **Saturation** | Adjusts color intensity | Muted ← → Vivid |
## Known limitations
* **One filter at a time:** You can't stack multiple filters. Applying a new filter replaces the previous one.
* **Filter presets deselect on manual adjustment.** If you tweak any slider after applying a filter, the filter preset deselects (your slider values stay).
* **Color adjustments are applied last.** When layering multiple effects, color adjustments are always applied after other effects. Learn more about [applying and adjusting effects](/effects-animations-transitions/apply-adjust).