> ## Documentation Index
> Fetch the complete documentation index at: https://help.descript.com/llms.txt
> Use this file to discover all available pages before exploring further.
# Animate visual layers
> Animate non-text layers in your scene to change their position, size, cropping, rotation, or opacity over time.
Move or change your image or videwo layers on screen with Descript's built-in library of animations. Or, build a custom animation using keyframes.
Descript also supports animations for text and captions layers. For that info, see [Animate text and captions](/effects-animations-transitions/text-animations).
## Add an animation to a layer
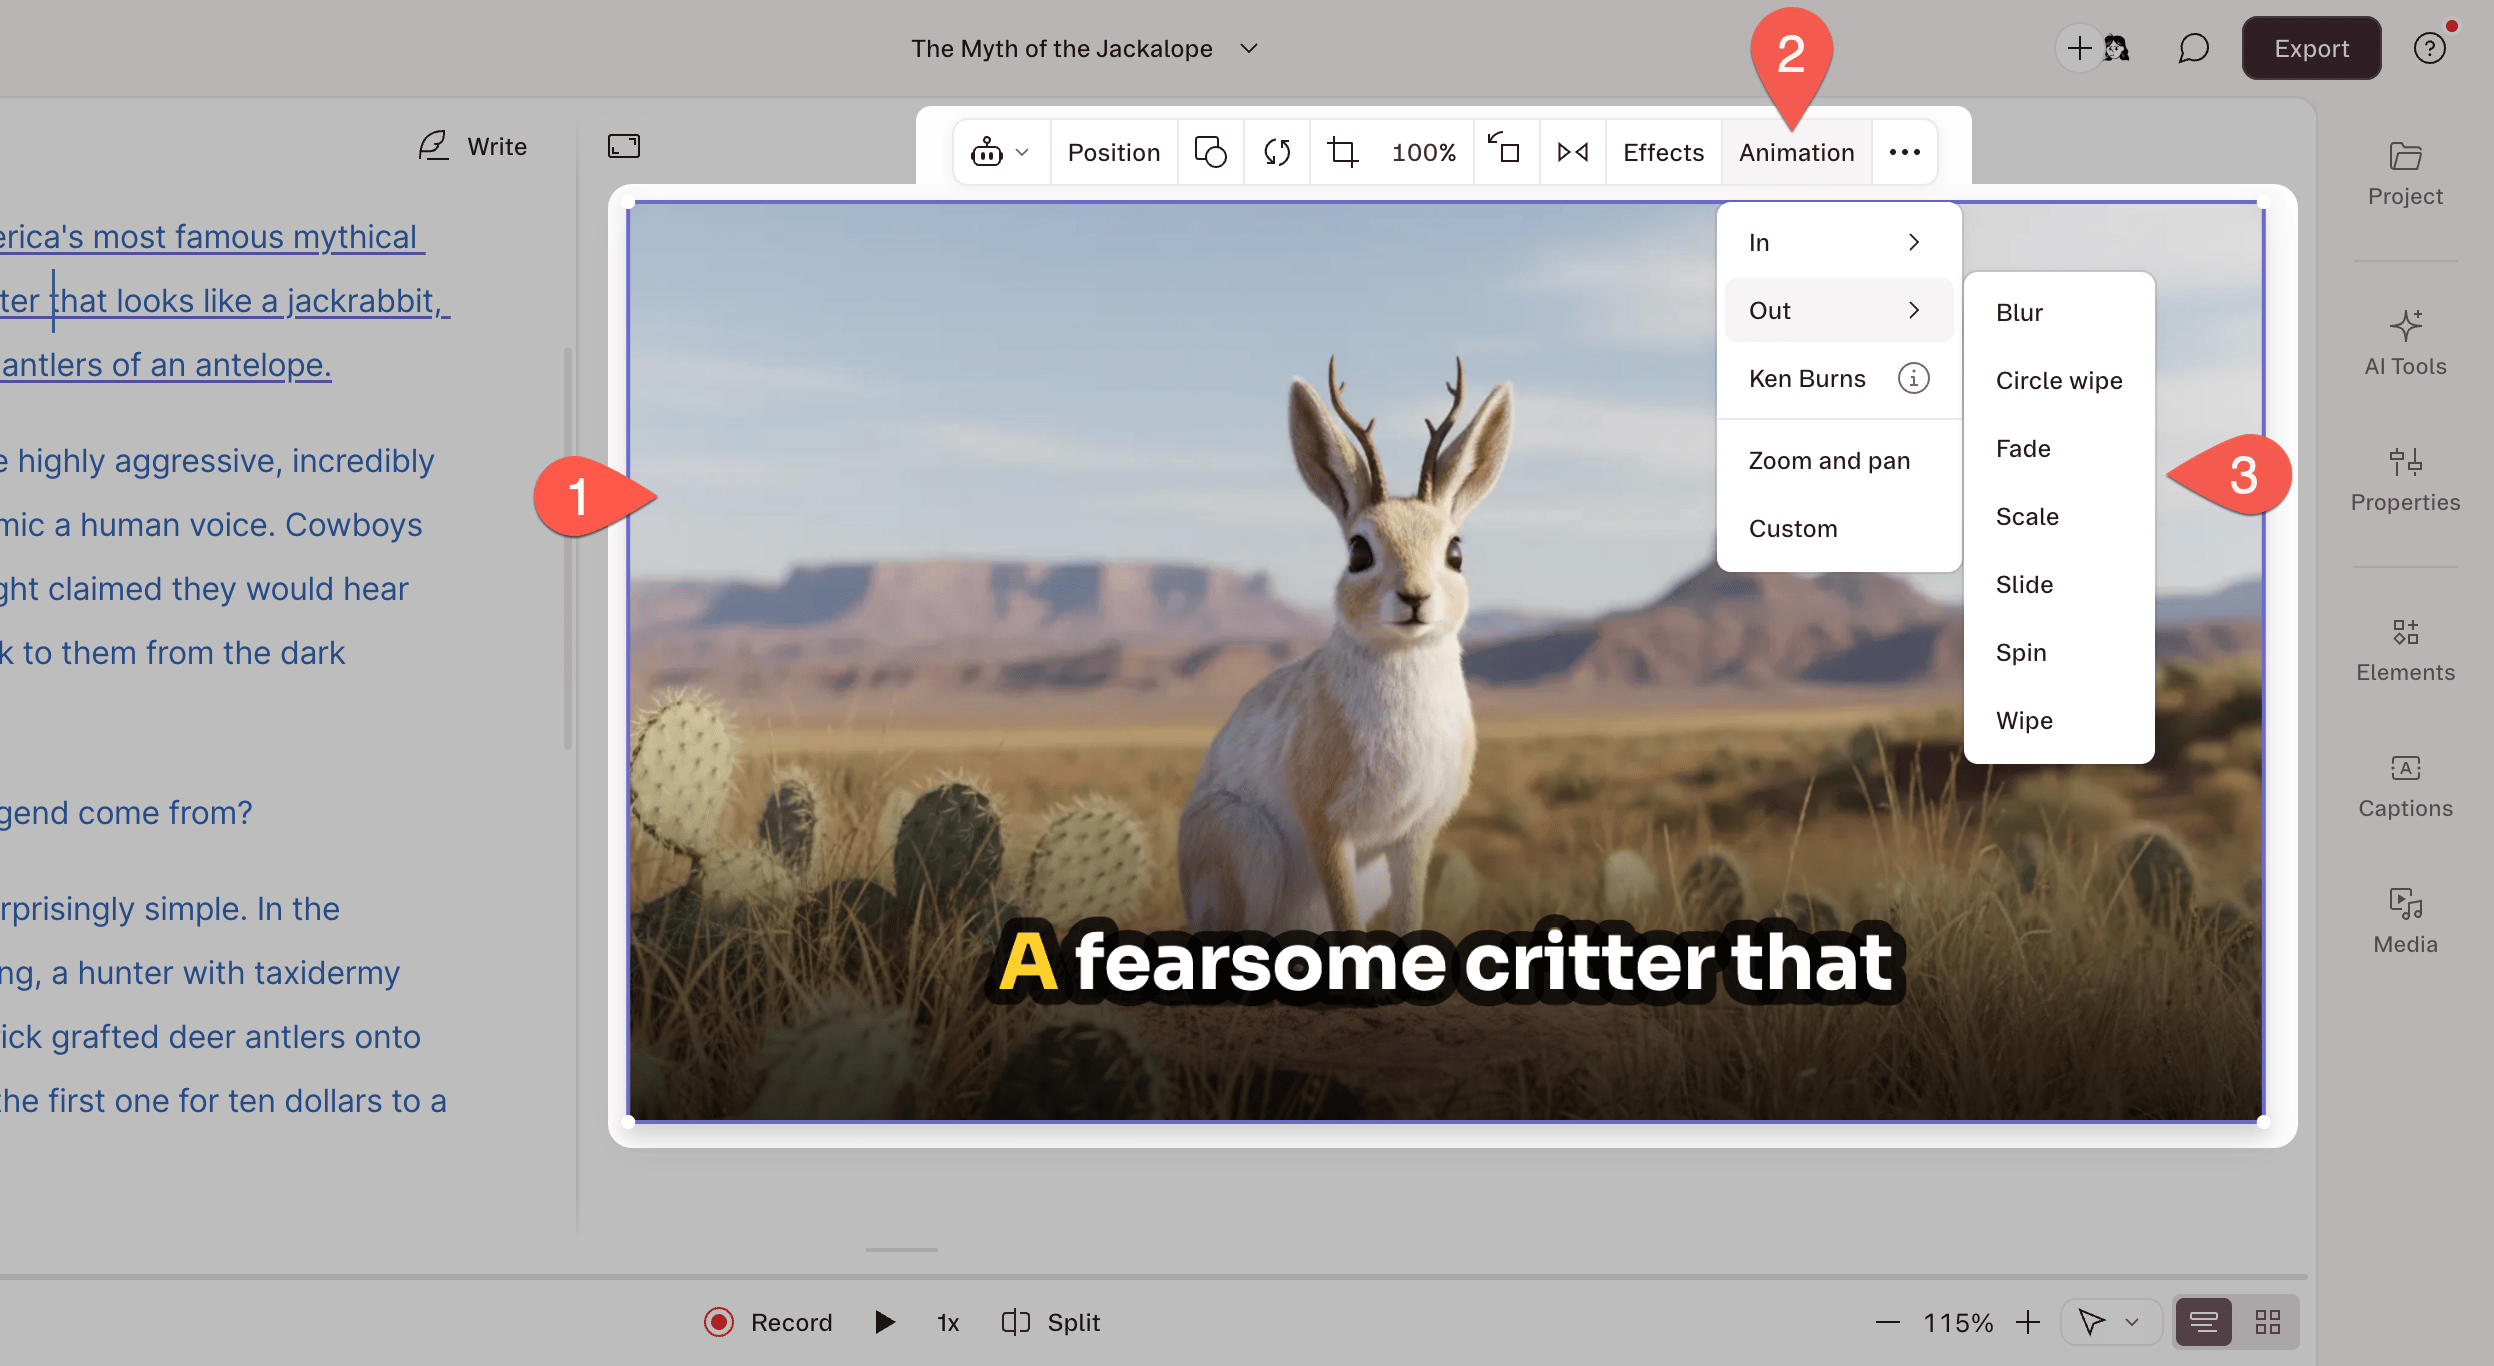
1. Select the visual layer in the [Scene Editor](/visuals/scene-editor-overview).
2. In the hover menu, click **Animation**.
3. Choose a preset from the dropdown, or select **Custom**.
 ### Remove an animation
1. Select the animated layer in the [Scene Editor](/visuals/scene-editor-overview).
2. Click **Animation** in the hover menu.
3. Open the options menu for the animation.
4. Select **Remove**.
You can also add or remove animations from the [Properties panel](/descript-tour/properties-panel).
## Available animation presets
Choose from the following in/out presets for a visual layer:
| Preset | Description |
| ---------------------------------------------------------------- | ----------------------------------------------------------- |
| Blur | Fade from or to a blurred layer. |
| Fade | Fade to or from black. |
| Scale | Animate the scale of a layer. |
| Slide | Slide a layer into or out of view from any direction. |
| Spin | Spin the layer into or out of view. |
| Wipe | Wipe the layer to reveal or hide it. |
| Zoom and pan | Zoom and pan across a visual. |
| [Ken Burns](/effects-animations-transitions/ken-burns-animation) | Smooth, directional zooms and pans with fine-tuned control. |
## Custom keyframe animations
While most use cases can be handled via [scene transitions](/effects-animations-transitions/transitions), a custom animation allows for more granular control of how a visual element appears, moves, or changes. Define the start and end using keyframes, then adjust properties like position, size, and opacity.
### Add and adjust a custom keyframe animation
1. Select a visual in the [Scene Editor](/visuals/scene-editor-overview).
2. Click **Animation**, then select **Custom**.
3. Your animation appears in the timeline with two keyframes.
### Remove an animation
1. Select the animated layer in the [Scene Editor](/visuals/scene-editor-overview).
2. Click **Animation** in the hover menu.
3. Open the options menu for the animation.
4. Select **Remove**.
You can also add or remove animations from the [Properties panel](/descript-tour/properties-panel).
## Available animation presets
Choose from the following in/out presets for a visual layer:
| Preset | Description |
| ---------------------------------------------------------------- | ----------------------------------------------------------- |
| Blur | Fade from or to a blurred layer. |
| Fade | Fade to or from black. |
| Scale | Animate the scale of a layer. |
| Slide | Slide a layer into or out of view from any direction. |
| Spin | Spin the layer into or out of view. |
| Wipe | Wipe the layer to reveal or hide it. |
| Zoom and pan | Zoom and pan across a visual. |
| [Ken Burns](/effects-animations-transitions/ken-burns-animation) | Smooth, directional zooms and pans with fine-tuned control. |
## Custom keyframe animations
While most use cases can be handled via [scene transitions](/effects-animations-transitions/transitions), a custom animation allows for more granular control of how a visual element appears, moves, or changes. Define the start and end using keyframes, then adjust properties like position, size, and opacity.
### Add and adjust a custom keyframe animation
1. Select a visual in the [Scene Editor](/visuals/scene-editor-overview).
2. Click **Animation**, then select **Custom**.
3. Your animation appears in the timeline with two keyframes.
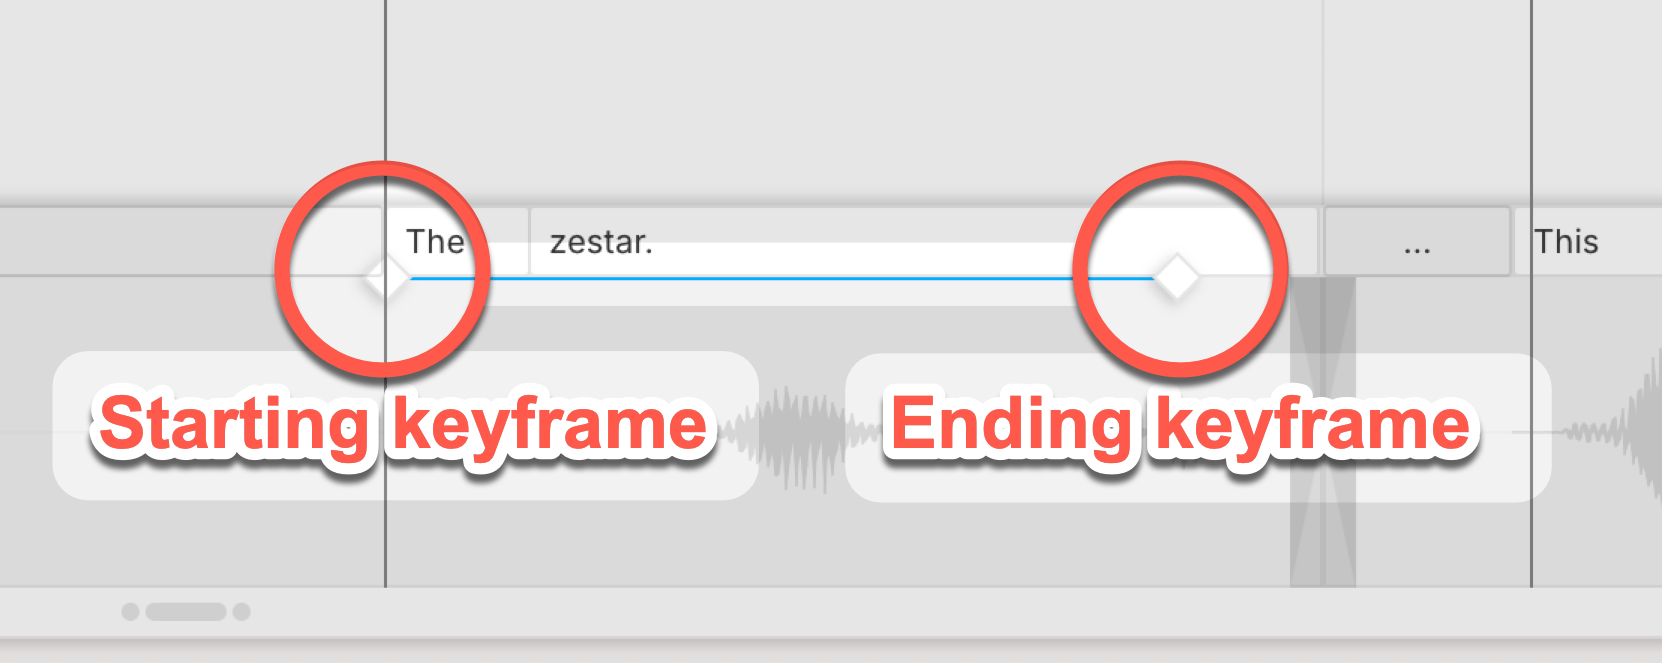 4. Select the start keyframe and adjust position, size, rotation, cropping, or opacity.
5. Repeat for the end keyframe.
6. Press `Esc` to exit animation mode.
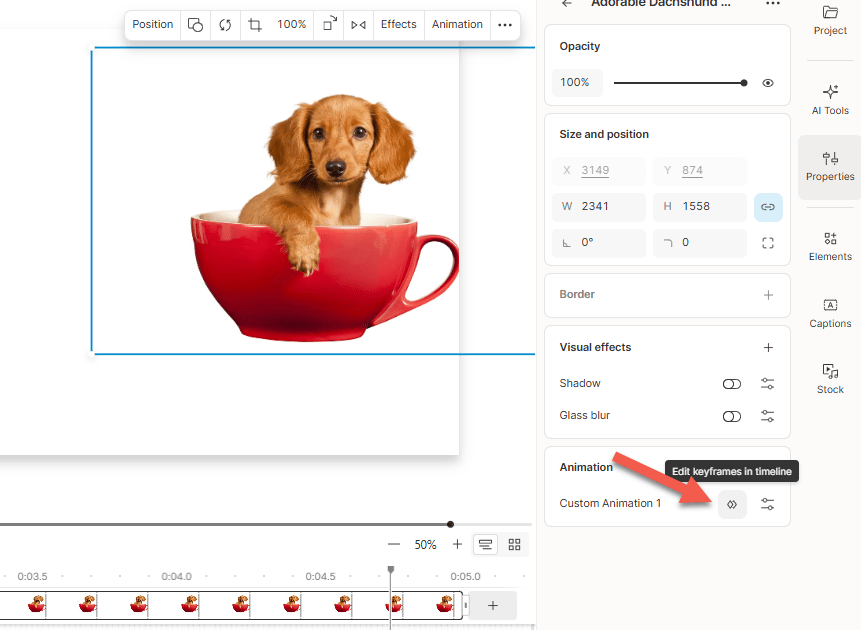
To re-adjust animations, click **Edit keyframes in timeline** in the Properties panel.
4. Select the start keyframe and adjust position, size, rotation, cropping, or opacity.
5. Repeat for the end keyframe.
6. Press `Esc` to exit animation mode.
To re-adjust animations, click **Edit keyframes in timeline** in the Properties panel.
 ## Animation curves
Animation curves control pacing between keyframes. By default, animations use a linear curve (constant speed), but easing options create more natural motion.
Open **Animation settings** in the [Properties panel](/descript-tour/properties-panel) and hover over the available options to see a preview of the available curves.
## Related topics
- [Layer visibility and order](/visuals/layer-visibility.md)
- [Layout packs overview](/templates-and-presets/overview.md)
- [Apply a layout to a scene](/templates-and-presets/layouts-apply.md)
- [Animate text and captions](/effects-animations-transitions/text-animations.md)
- [Waveforms](/visuals/waveforms.md)
## Animation curves
Animation curves control pacing between keyframes. By default, animations use a linear curve (constant speed), but easing options create more natural motion.
Open **Animation settings** in the [Properties panel](/descript-tour/properties-panel) and hover over the available options to see a preview of the available curves.
## Related topics
- [Layer visibility and order](/visuals/layer-visibility.md)
- [Layout packs overview](/templates-and-presets/overview.md)
- [Apply a layout to a scene](/templates-and-presets/layouts-apply.md)
- [Animate text and captions](/effects-animations-transitions/text-animations.md)
- [Waveforms](/visuals/waveforms.md)